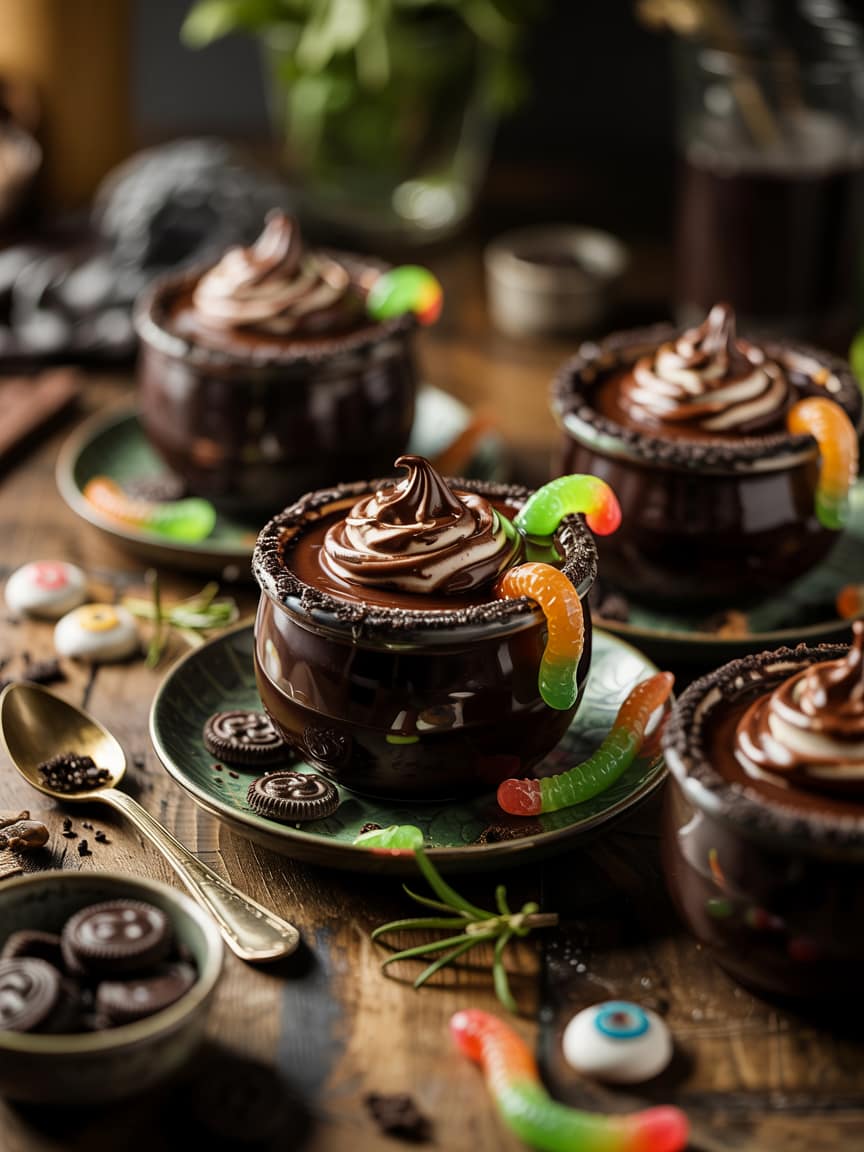
Witch’s Cauldron Pudding Cups
There’s something delightfully theatrical about a dessert that arrives like a mini magic trick — dark, glossy, and brimming with texture. Enter Witch’s Cauldron Pudding Cups: little cups of silky chocolate pudding, bubbling (metaphorically) with spooky toppings, unexpected crunch, and a bright pop of color. As a professional chef who loves food that tells a story, I designed this recipe to be both show-stopping and reliable — simple enough for home cooks, flexible enough for entertaining, and built so you can scale, tweak, and present it with panache.
Below you’ll find everything: an ingredient-by-ingredient breakdown, step-by-step preparation, technique tips, make-ahead strategies, dietary variations, fault-fixing advice, and creative serving ideas. Whether you’re hosting a Halloween party or just want to raise a little mischief at the dinner table, these Witch’s Cauldron Pudding Cups will delight.
What makes Witch’s Cauldron Pudding Cups special?
This dessert combines a deeply chocolatey pudding base with layers and textural contrasts that transform a basic pudding into a theatrical experience. The “cauldron” comes alive through:
- A silky, cooked chocolate pudding — dark and rich, with smooth mouthfeel.
- A crunch layer (think crushed cookies or toasted nuts) representing the “char” at the cauldron’s rim.
- Playful toppings — gummy worms, candy eyes, edible gold dust, orange zest, crushed peppermint, or popping candy to add a little crackle.
- Optional smoky theatrics when served (dry ice handled carefully by adults) or little sugar “bubbles” using a spoon of carbonated sauce for fizz.
The result is familiar and comfortingly chocolatey, but with a whimsical, tactile edge that will make guests smile.
Quick recipe summary (chef’s elevator pitch)
Witch’s Cauldron Pudding Cups are layers of dark chocolate cooked pudding, crunchy cookie crumb, and whipped cream, finished with themed toppings. They’re quick to assemble, can be made ahead (pudding keeps beautifully), and are endlessly adaptable — vegan, gluten-free, or boozy adult versions are all possible without losing the dessert’s dramatic charm.
Servings: 8 pudding cups
Active prep time: 25–30 minutes
Total time (including chilling): 2–3 hours (chill time optional but recommended)
Ingredients
This ingredient list is intentionally modular: core components first, then optional topping and variation suggestions. Use the base recipe exactly as written the first time — then personalize.
Chocolate Pudding Base (serves 8)
- 4 cups (960 ml) whole milk (or 3 cups dairy + 1 cup heavy cream for extra silk; see variations below for non-dairy)
- ½ cup (100 g) granulated sugar
- ⅓ cup (40 g) Dutch-process cocoa powder (unsweetened) — if unavailable, natural cocoa is okay but flavor shifts slightly
- ¼ cup (30 g) cornstarch
- 1 tsp fine sea salt
- 4 oz (115 g) bittersweet chocolate (60–70% cacao), finely chopped
- 2 large egg yolks, beaten (optional — for extra richness and stability; see custard option)
- 2 tbsp unsalted butter, room temperature
- 1 tsp pure vanilla extract
Crunch Layer (choose one, or combine)
- 1½ cups crushed Oreo cookies (filling removed or left in for extra sweetness)
- OR 1½ cups toasted panko mixed with 3 tbsp browned butter (for savory-sweet contrast)
- OR 1½ cups toasted, chopped hazelnuts or almonds, lightly salted
Whipped Topping
- 1½ cups heavy cream, cold
- 2–3 tbsp powdered sugar (to taste)
- ½ tsp vanilla extract
Thematic Toppings (pick several for a cauldron effect)
- Gummy worms (for the classic spooky look)
- Candy eyes or edible glitter/dust
- Orange candy sprinkles or crushed candy corn
- Popping candy (sparklers for the tongue — optional)
- Black lava sugar (or black sanding sugar) for a shiny rim
- A few drops of edible food coloring mixed into whipped cream for colored “foam”
Optional Adult Twist
- 2 tbsp dark rum, Kahlúa, or coffee liqueur — stir into warm pudding before chilling.
Equipment you’ll need
- Medium saucepan
- Whisk (preferably silicone or stainless)
- Heatproof bowl (for a chocolate bain-marie if tempering)
- Fine-mesh sieve (optional but recommended for ultra-smooth pudding)
- Measuring cups and spoons
- Rubber spatula
- Small cups or glasses for serving (4–8 oz capacity)
- Mixing bowls and electric whisk or stand mixer for whipped cream
Step-by-step method (professional technique, home-friendly)
Below I walk you through the most reliable way to make the pudding and assemble the Witch’s Cauldron Pudding Cups so your texture and flavor are on point.
1. Prep: measure, sift, chill
Measure all ingredients. If using cocoa powder, sift it with the cornstarch and sugar to avoid lumps. Chill your serving cups in the refrigerator if you want a cool presentation.
2. Make the dry mix
In a medium bowl, whisk together the sugar, cocoa powder, cornstarch, and salt until evenly combined.
3. Heat the milk
In a medium saucepan, heat the milk to steaming over medium heat — look for tiny bubbles forming along the edge (do not boil). Remove about ½ cup of the hot milk and whisk it into the dry mix to make a smooth slurry — this prevents lumps when you add the rest.
4. Thicken the pudding
Pour the slurry back into the saucepan and whisk constantly over medium heat. The mixture will thicken in 3–6 minutes — it should reach a pudding-like consistency that coats the back of a spoon. If you want extra silk and richness, temper the beaten egg yolks: add a ladle of hot pudding into the yolks while whisking, then return yolk mixture to the pan and cook 1 more minute (do not boil).
5. Add chocolate, butter, and vanilla
Remove from the heat. Immediately stir in the chopped bittersweet chocolate and butter until smooth and glossy. Finish with vanilla. If you want an adult cauldron, stir in the rum or liqueur now.
6. Strain for extra smoothness (optional)
For restaurant-level silkiness, push the warm pudding through a fine-mesh sieve into a clean bowl to remove any stubborn bits.
7. Chill the pudding
Cover the surface of the pudding with plastic wrap so a skin doesn’t form. Chill for at least 1 hour, ideally 2–3 hours. Pudding will thicken as it cools.
8. Prepare the crunch layer and whipped cream
While the pudding chills, prepare your crunch layer. Crush cookies in a zip-top bag with a rolling pin for even crumbs or toast nuts until fragrant. For whipped cream, whisk cold cream with powdered sugar and vanilla to soft or medium peaks.
9. Assemble the cauldrons
Spoon a thin layer (about 1–2 tbsp) of the crunch layer into the bottom of each chilled serving cup, press gently. Pipe or spoon pudding on top so the cup is about ¾ full. Add a small mound of crunch on top near the rim for a “charred lip” effect. Top with a dollop of whipped cream. Finish with themed toppings — gummy worms peeking out, candy eyes perched like toadstools, or a sprinkle of black sanding sugar around the rim.
Presentation ideas (make it theatrical)
- Mini cauldrons: Use matte black ramekins or small hollowed-out dark chocolate bowls to serve; they look like little cauldrons.
- Rim sugar: Wet the rim of the glass with simple syrup and dip in black sanding sugar or crushed chocolate cookie crumbs to create a molten-rim effect.
- Edible smoke: For adult-only tables, place a small amount of dry ice in a separate small cup of warm water near each plate (handle dry ice safely with gloves and do not allow guests, especially children, to touch). Alternatively, use flavored mist from a culinary smoking gun for dramatic smoke.
- Layer play: Alternate thin pudding and crunch layers to create visible strata — a cross-section of cauldron chaos.
- Garnish story: Add a single rosemary “twig” (looks like a miniature broomstick) or a shard of toasted meringue “flame.”
Tips and technique notes (chef-level tricks)
- No lumps promise: The key to silky pudding is tempering and whisking constantly as the cornstarch activates. Sifting dry ingredients prevents clumps.
- Don’t overcook: Once the pudding thickens, remove promptly. Overcooking makes it pasty.
- Egg yolks optional: Yolks add richness and stability (custard-like). If you’re worried about raw eggs, cook the yolks via tempering as described above.
- Chocolate selection: Use good-quality bittersweet chocolate for depth. Milk chocolate will yield a sweeter, lighter pudding. For intense flavor, blend 50/50 bittersweet and 70% dark.
- Balance sweetness: If your toppings are very sweet (candies, cookie crumbs), consider reducing the pudding sugar by 1–2 tablespoons.
- Texture contrast: The crunch layer is crucial — it’s the “cauldron crust.” Use toasted nuts or browned butter panko for a savory contrast to the sweet pudding.
Variations — make it yours
Vegan Witch’s Cauldron Pudding Cups
- Replace milk with full-fat canned coconut milk + almond milk (3:1 ratio) or soy milk for a neutral profile.
- Replace butter with a vegan butter or 1 tbsp coconut oil.
- Omit egg yolks and use an extra tablespoon of cornstarch for thickening.
- Whipped topping: use chilled coconut cream whipped with 1–2 tbsp powdered sugar.
Gluten-Free Version
- Use gluten-free chocolate and swap the cookie crumbs for crushed gluten-free cookies or toasted, chopped nuts.
- Panko crunch can be replaced with toasted gluten-free cereal or crushed gluten-free graham crackers.
Boozy Adult Cauldron
- Stir 1–2 tbsp of dark rum, bourbon, or coffee liqueur into the warm pudding before chilling. Alternatively, macerate a handful of cherries in liqueur and layer them into each cup.
Spiced Pumpkin Cauldron (Seasonal)
- Add ¾ cup pumpkin purée and 1 tsp pumpkin pie spice to the pudding mixture; reduce milk by ¾ cup to maintain texture. Perfect for autumn gatherings.
Matcha Witch’s Cauldron
- Swap cocoa for high-quality matcha and follow the same cornstarch technique for a green “poison” pudding. Add white chocolate shards as contrast.
Make-ahead & storage
- Pudding: Keeps well in the refrigerator, covered, for up to 4 days. Remove from fridge 20 minutes before serving for best texture.
- Crunch: Store separate in an airtight container for up to one week; add right before serving to keep crunch.
- Whipped cream: Best made fresh, but stabilized whipped cream (add 1 tsp unflavored gelatin bloomed in 2 tbsp water, melted, and whisked into cream) will keep up to 24–48 hours.
- Assembled cups: You can fully assemble the cauldrons up to 24 hours ahead if the crunch layer is sturdy (e.g., toasted nuts). If using delicate cookies for crunch, store separately and assemble just before serving.
Troubleshooting (what can go wrong and how to fix it)
- Pudding is lumpy: Rewarm gently and whisk vigorously. If lumps persist, press through a fine sieve. Next time, whisk the slurry thoroughly and pour slowly back into the pan while whisking.
- Pudding too thin: Simmer longer to reduce, or whisk 1 tbsp cornstarch with 2 tbsp cold milk, bring the pudding to a gentle simmer, and whisk the slurry in — cook until thickened.
- Pudding too thick / pasty: Stir in a few tablespoons of warm milk to loosen and restore silkiness.
- Skin forms on top: Press plastic wrap directly on the pudding surface while cooling to prevent skin.
- Whipped cream breaks or weeps: Chill bowl and whisk before whipping and don’t overbeat; stop at medium peaks. If it starts to weep, a quick whisk and chilling will help.
Pairing suggestions (drinks & accompaniments)
- Coffee: A bold espresso or lungo complements the bitterness of the chocolate.
- Dessert wine: Ruby port or a late-harvest Zinfandel for an indulgent match.
- Cocktails: Serve with a smoky Old Fashioned or a salted caramel espresso martini for an adult party.
- Savory bite: A small plate of cured meats and sharp cheeses before dessert makes the chocolate pop by contrast — ideal for a Halloween tasting menu.
Allergies & dietary notes
- Nuts: Use cookie crumbs or panko instead of nuts if you’re serving guests with nut allergies.
- Dairy: See vegan alternative above. Full-fat coconut milk yields a luscious texture but will carry coconut flavor.
- Eggs: Optional in the base — see technique notes if you choose to omit them.
Serving suggestions and seasonality
Witch’s Cauldron Pudding Cups are perfect for Halloween, but they’re equally fun for themed dinners, kids’ parties (skip alcohol and dry ice), or any time you want dessert to feel festive. For fall, add toasted pumpkin seeds and candied pecans. For winter, swap the gummy worms for sugared cranberries and small peppermint shards.
To serve at a larger event: fill 4-oz cups or disposable mini cauldrons. For intimate dinners, use glassware and garnish with a single edible gold leaf for dramatic elegance.
Nutrition (approximate per serving)
A rough estimate (per serving, standard recipe with whipped cream and cookie crumbs):
Calories: ~420–520 kcal
Fat: 24–30 g
Saturated Fat: 12–16 g
Carbohydrates: 45–55 g
Sugar: 32–40 g
Protein: 4–6 g
Nutrition varies widely based on milk choice, use of alcohol, and toppings. For a lighter version, use low-fat milk (texture will be slightly less silky) and lighten or omit whipped cream.
Final notes from a chef
Witch’s Cauldron Pudding Cups are a wonderful combination of comfort and theater. The success of this recipe lies in three things: a silky base pudding, a crunchy contrast, and playful finishing touches. Don’t be afraid of simplicity — a few well-executed components do more than a complicated, rushed dessert. Make the pudding ahead, then have fun with toppings and presentation when your guests arrive. That last-minute creativity is where the witchcraft happens.

Witch’s Cauldron Pudding Cups
Ingredients
Chocolate Pudding Base:
- 4 cups whole milk or 3 cups milk + 1 cup heavy cream
- ½ cup granulated sugar
- ⅓ cup Dutch-process cocoa powder
- ¼ cup cornstarch
- 1 tsp sea salt
- 4 oz bittersweet chocolate 60–70%, finely chopped
- 2 large egg yolks optional, for richness
- 2 tbsp unsalted butter
- 1 tsp vanilla extract
Crunch Layer (choose one):
- 1½ cups crushed Oreo cookies
- OR 1½ cups toasted panko mixed with 3 tbsp browned butter
- OR 1½ cups toasted chopped hazelnuts or almonds
Whipped Topping:
- 1½ cups heavy cream cold
- 2 –3 tbsp powdered sugar
- ½ tsp vanilla extract
Toppings (optional but fun):
- Gummy worms
- Candy eyes
- Black sanding sugar
- Popping candy
- Orange sprinkles or candy corn
Instructions
Step 1: Prepare the dry mix
- In a bowl, whisk together sugar, cocoa powder, cornstarch, and salt until well combined.
Step 2: Heat the milk
- In a medium saucepan, warm the milk over medium heat until steaming (do not boil). Add ½ cup of the hot milk to the dry mix, whisking into a smooth paste.
Step 3: Thicken the pudding
- Pour the mixture back into the saucepan. Whisk continuously over medium heat until the pudding thickens (about 3–6 minutes).
Step 4: Enrich the base
- If using egg yolks, temper them by whisking in a little hot pudding, then return to the pan. Stir constantly for 1 minute more.
Step 5: Finish the pudding
- Remove from heat. Stir in chopped chocolate, butter, and vanilla until glossy and smooth. Cover with plastic wrap (touching the surface) and chill for at least 1 hour.
Step 6: Make the crunch layer & whipped cream
- Crush cookies or toast nuts for the crunch layer. For whipped cream, whisk heavy cream, powdered sugar, and vanilla until soft peaks form.
Step 7: Assemble the cauldrons
- Add a spoonful of crunch layer into each cup. Fill ¾ full with pudding. Top with whipped cream and decorate with spooky toppings like gummy worms or candy eyes.
Step 8: Chill & serve
- Refrigerate until ready to serve. Best served cold with a sprinkle of Halloween magic!
Notes
- Storage: Keep pudding cups covered in the fridge for up to 3 days. Add toppings just before serving to keep them fresh.
- Vegan Option: Use coconut milk and vegan butter; skip the egg yolks.
- Gluten-Free Option: Use gluten-free cookies or toasted nuts for the crunch layer.
- Make Ahead: The pudding can be made 2–3 days ahead and assembled on the day of serving.
- Presentation Tip: Serve in mini black ramekins or clear glasses for a true “cauldron” look.