Sticky Chicken Rice Bowls Recipe

There’s something deeply comforting about a bowl of warm rice piled with tender, sticky chicken, crisp veggies, and a glossy sauce that clings to every bite. The Sticky Chicken Rice Bowls recipe below is my go-to for weeknights that need a little lift and for dinner parties when you want something homey and impressive without a ton of stress. In this post I’ll walk you through every detail — ingredients, technique, timing, flavour science, plating, variations (vegan, low-carb, kid-friendly), make-ahead and storage tips, troubleshooting, serving suggestions, and more. Read on and you’ll be making restaurant-quality sticky chicken rice bowls in your own kitchen.
Why this Sticky Chicken Rice Bowls recipe works
At the heart of great bowl food are a few simple truths:
- Texture contrast — sticky rice, tender chicken, and crunchy vegetables create mouthfeel variety that keeps the dish interesting.
- Balanced sauce — the sauce combines sweet, salty, umami, and acid so it’s sticky and flavorful without being cloying.
- Layering flavors — a quick marinade for the chicken, a reduction glaze, and bright finishing touches (fresh herbs, acid, sesame) make the bowl feel complex even when the steps are straightforward.
- Scalability — it’s easy to scale up for meal prep or scale down for two; components hold up well in the fridge.
This Sticky Chicken Rice Bowls recipe embraces those principles and focuses on techniques that maximize flavor with minimal fuss.
Ingredients — what you’ll need (serves 4)
For the chicken & marinade
- 1.25 pounds (about 600 g) boneless, skinless chicken thighs — cut into 1–1.5 inch pieces
Why thighs? They stay juicy and handle high heat well. You can use breast if you prefer leaner meat. - 2 teaspoons toasted sesame oil
- 1 tablespoon low-sodium soy sauce
- 1 tablespoon rice wine or dry sherry (optional, but helps tenderize)
- 1 teaspoon cornstarch (helps the glaze cling)
For the sticky glaze / sauce
- 1/3 cup low-sodium soy sauce
- 1/4 cup honey (or maple syrup for vegan option)
- 3 tablespoons hoisin sauce (adds body and depth) — optional, but recommended
- 2 tablespoons rice vinegar
- 2 teaspoons fresh grated ginger (about a 1-inch knob)
- 3 cloves garlic, minced
- 1 tablespoon chili garlic sauce or sriracha — optional if you want heat
- 2 teaspoons cornstarch mixed with 2 tablespoons cold water (slurry for thickening)
For the rice
- 2 cups short-grain or medium-grain rice (e.g., Japanese sushi rice or Calrose) — rinsed until water runs clear
Note: If you want classic sticky/glutinous rice (khao niao), use sweet glutinous rice and follow its soaking/steaming method — see variations below. - 2 1/4 cups water (stovetop) or as recommended by your rice cooker
Vegetables & garnishes
- 2 cups broccoli florets, lightly steamed or roasted
- 1 medium carrot, julienned or thinly sliced
- 1 cup cucumber ribbons or slices (for freshness)
- 2 scallions, thinly sliced (greens and whites separated)
- 2 tablespoons toasted sesame seeds (white or black)
- Fresh cilantro or Thai basil leaves, optional
- Lime wedges, for squeezing
Optional finishing oil
- 1 teaspoon neutral oil (canola or vegetable) + 1/2 teaspoon toasted sesame oil — for drizzling
Equipment
- Heavy skillet or cast-iron pan (10–12 inch) or large nonstick skillet
- Small saucepan (for sauce reduction)
- Rice cooker or medium saucepan with tight-fitting lid
- Sharp knife and cutting board
- Measuring cups and spoons
- Mixing bowls and tongs
- Whisk for the sauce
Prep work (the chef’s short checklist)
Do these first — they’ll make the actual cooking simple and fast:
- Rinse rice until the water runs clear; drain and set aside.
- Chop chicken into bite-sized pieces and toss with sesame oil, soy, rice wine, and cornstarch. Let sit 10–15 minutes at room temp.
- Mince garlic and grate ginger; whisk together sauce ingredients except cornstarch slurry.
- Cut vegetables: slice scallions, julienne carrot, trim broccoli into florets.
- Measure out cornstarch slurry for later.
Step-by-step cooking instructions
1 — Cook the rice
Option A — Rice cooker: add rinsed rice and water, then cook according to manufacturer’s instructions. Fluff and keep warm.
Option B — Stovetop: combine rinsed rice and 2 1/4 cups water in a medium saucepan. Bring to a boil over medium-high heat, reduce to a low simmer, cover tightly and cook for 15 minutes. Turn off heat and let rest, covered, for 10 minutes before fluffing.
Pro tip: For extra gloss and slight chew in the rice, add 1 teaspoon neutral oil or 1/2 teaspoon toasted sesame oil while fluffing.
2 — Brown the chicken
- Heat a large skillet (cast iron recommended) over medium-high heat until hot. Add 1 tablespoon neutral oil.
- Add chicken pieces in a single layer; don’t overcrowd the pan — cook in batches if needed. Let sear without moving for 2–3 minutes to form a crust.
- Toss and continue to cook until chicken is about 85% done (internal temp ~160°F / 71°C) — about another 2–3 minutes. Remove chicken to a plate. It will finish cooking in the glaze.
Why this matters: Searing builds Maillard flavor (caramelized savory notes) that the sweet glaze accentuates. Don’t rush the browning.
3 — Make the sticky glaze
- In a small saucepan, combine soy sauce, honey, hoisin, rice vinegar, grated ginger, minced garlic, and chili sauce (if using). Bring to a gentle simmer over medium heat.
- Let simmer for 2–3 minutes to meld flavors, then whisk in the cornstarch slurry (2 tsp cornstarch + 2 tbsp cold water).
- Stir until the sauce thickens to a glossy glaze — about 1–2 minutes. Remove from heat.
Chef tip: Taste the glaze and adjust: more vinegar for brightness, more honey for sweetness, or extra soy for saltiness. The sauce should be balanced — sweet with a savory backbone.
4 — Finish the chicken in the glaze
- Return chicken to the hot skillet and pour the sticky glaze over it. Toss to coat and let the glaze caramelize lightly for 1–2 minutes. Watch carefully; sugar burns easily.
- When chicken reaches 165°F (74°C) and is evenly coated with a thick, shiny glaze, remove from heat.
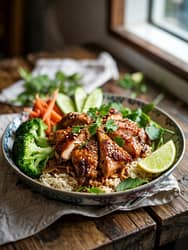
5 — Assemble the Sticky Chicken Rice Bowls
- Spoon sticky rice into bowls.
- Arrange glazed chicken over rice.
- Add vegetables around the chicken — broccoli, carrots, cucumber.
- Sprinkle with sliced scallion whites and greens, toasted sesame seeds, and fresh cilantro or Thai basil.
- Give each bowl a lime wedge and a tiny drizzle of finishing oil if desired.
Tips for perfect Sticky Chicken Rice Bowls
- Use thighs for juiciness. Thighs are more forgiving than breasts and pair beautifully with sweet glazes.
- Don’t skip the cornstarch in the marinade. It creates a slight velvety coating that helps the glaze stick.
- High heat for browning, moderate heat for glazing. Sear on high, then reduce to medium when adding the sugar-based glaze to prevent burning.
- Batch sear if necessary. Crowding the pan causes steaming and pale chicken. Better to cook in two batches and combine at the end.
- Adjust sweetness and acid. Every honey and soy varies — taste and tweak. If your glaze gets too thick, thin with a teaspoon of water at a time while warming.
- Finish with acid. A squeeze of lime brightens the whole bowl and balances the sweetness.
Flavor variations & swaps
1. Korean-style sticky chicken
- Swap honey for 2 tablespoons gochujang + 2 tablespoons maple syrup; add toasted sesame seeds and a sprinkle of Korean chili flakes (gochugaru).
2. Teriyaki-style
- Use a classic teriyaki sauce: soy, mirin, sake, sugar, and a thicker glaze. Add a touch of grated apple for authentic sweetness and fermenty depth.
3. Sticky orange chicken
- Replace rice vinegar with fresh orange juice (1/4 cup) and add 1 tablespoon orange zest. Finish with a pinch of red pepper flakes.
4. Vegan sticky “chicken”
- Use pressed and cubed extra-firm tofu or seitan in place of chicken. Pan-fry or bake until golden, then toss in the same glaze (substitute maple syrup for honey and ensure hoisin is vegan).
5. Low-carb / Keto
- Replace rice with cauliflower rice (lightly sautéed) and swap honey for a keto-friendly sweetener like allulose (adjust to taste).
6. Classic sticky rice (glutinous)
- If you want the authentic sticky or glutinous rice often used in Southeast Asia, use sweet glutinous rice (khao niao). Soak for 4–6 hours and steam in a bamboo steamer or basket for 20–30 minutes. This yields a chewier, denser rice than sushi rice.
Make-ahead, meal prep & storage
- Cooked glazed chicken: Keeps 3–4 days in an airtight container in the refrigerator. Store the sauce separately or with the chicken; if stored together, the chicken may darken slightly.
- Rice: Cooked rice keeps well for 3–4 days. Reheat with a splash of water and a microwave-safe cover or in a skillet with a tablespoon of water to restore moisture.
- Vegetables: Prep raw veggies ahead (julienne carrots, slice cucumbers, blanch broccoli) and store separately to keep textures fresh.
- Freezing: Cooked chicken in glaze can be frozen for up to 2 months. Thaw overnight in the fridge and reheat gently to avoid overcooking.
- Assembling bowls: For meal prep bowls, pack rice, chicken, and veggies in airtight containers. Add garnishes and lime wedges fresh when serving.
Pairing & serving suggestions
- Saucy rice bowls: Keep chopsticks and a spoon handy. The spoon helps scoop rice and sauce; chopsticks are great for the chicken and veg.
- Side dishes: Quick pickled cucumbers, kimchi, or a simple cabbage slaw complement the richness.
- Drinks: A crisp lager, chilled riesling, or jasmine tea pairs beautifully. For non-alcoholic options, citrusy sparkling water or iced green tea works well.
- Presentation: Serve on shallow bowls with a little extra sauce drizzled artistically across the top, and a scattering of scallion greens and toasted sesame seeds.
Dietary notes & swaps
- Gluten-free: Use tamari or gluten-free soy sauce and check that hoisin is gluten-free (or omit hoisin and increase a touch of honey and sesame oil).
- Nut-free: This recipe is naturally nut-free; avoid any additional nut garnishes.
- Lower-sodium: Use low-sodium soy sauce and taste before adding extra salt. Vinegar and lime help lift flavors without salt.
- Vegan: See the vegan tofu or seitan swap above and use maple syrup or agave instead of honey.
Troubleshooting common problems
- Sauce too thin: Simmer longer to reduce, or whisk in a touch more cornstarch slurry (mix cornstarch with cold water before adding).
- Sauce too thick or sticky after cooling: Thin with a teaspoon of warm water and reheat gently.
- Chicken dry: You likely overcooked it. Next time use thighs or remove chicken slightly underdone during searing — it will finish cooking in the glaze. When reheating, add a splash of water or broth and cover to retain moisture.
- Rice not sticky enough: Use short-grain rice or slightly less water for stickier texture. For true glutinous stickiness, use sweet glutinous rice and follow soak-and-steam method.
- Burning glaze: Reduce heat before adding the glaze; sugar caramelizes quickly. Stir continuously and don’t let it sit on very high heat.
Frequently asked questions (FAQ)
Q: Can I use chicken breast instead of thighs?
A: Yes. Chicken breast will be leaner and cooks faster — watch closely to avoid drying out. Consider marinating slightly longer or slicing into thinner pieces for even cooking.
Q: Is hoisin necessary?
A: No. Hoisin adds depth and thickness. If you don’t have it, increase honey or maple syrup slightly and add a teaspoon of oyster sauce (if not vegetarian) or miso paste for umami.
Q: Can I make this in an oven or air fryer?
A: Absolutely. For oven: roast chicken pieces at 425°F (220°C) for 10–15 minutes until almost done, then toss with glaze and broil 1–2 minutes to caramelize. For air fryer: cook at 400°F (200°C) for 8–10 minutes, then glaze.
Q: How spicy is this?
A: It’s mild by default. Add more chili garlic sauce or fresh chilies to increase heat.
Nutrition (approximate per serving)
A rough estimate (varies by exact ingredients and portion sizes): 450–700 calories per bowl, depending on rice portion, cut of chicken, and amount of sauce. Use lean chicken breast and less honey for a lower-calorie bowl, or increase vegetables and reduce rice for a lighter meal.
Plating like a pro
- Warm the bowl first — a warm bowl keeps rice and sauce at the right temp.
- Spoon rice into one half of the bowl, making a small nest.
- Fan the glazed chicken alongside the rice.
- Add vegetables in distinct piles or in a color wheel around the chicken for visual appeal.
- Finish with bright elements: lime wedge, scallion greens, sesame seeds, and herbs.
- Optional: a light drizzle of sesame oil or a tiny dot of chili oil for color.
Serving occasions & scaling
- Weeknight dinner: This recipe comes together in under 45 minutes from start to finish (including rice).
- Meal prep for the week: Doubles easily; store components separately for freshness.
- Dinner party: For a crowd, keep the chicken and sauce warm in a shallow pan and let guests assemble their own bowls. Provide extra garnishes for a personal touch.
Final chef’s notes
Sticky Chicken Rice Bowls are one of those dishes where small technical details make a big difference: a good sear on the chicken, a properly thickened glaze, and a bright finishing squeeze of acid transform simple ingredients into something addictive. This recipe is flexible — play with flavours (Korean, teriyaki, orange), swap proteins comfortably, and scale to feed one or ten.
Sticky Chicken Rice Bowls Recipe
Ingredients
For the Chicken Marinade
- 1.25 lbs 600 g boneless skinless chicken thighs, cut into bite-sized pieces
- 2 tsp toasted sesame oil
- 1 tbsp low-sodium soy sauce
- 1 tbsp rice wine or dry sherry optional
- 1 tsp cornstarch
- For the Sticky Glaze
- 1/3 cup low-sodium soy sauce
- 1/4 cup honey or maple syrup
- 3 tbsp hoisin sauce
- 2 tbsp rice vinegar
- 2 tsp grated fresh ginger
- 3 garlic cloves minced
- 1 tbsp chili garlic sauce or sriracha optional for heat
- 2 tsp cornstarch mixed with 2 tbsp cold water slurry
For the Rice
- 2 cups short-grain or medium-grain rice rinsed
- 2 1/4 cups water
- For Serving & Toppings
- 2 cups broccoli florets steamed or roasted
- 1 carrot julienned
- 1 cup cucumber slices or ribbons
- 2 scallions thinly sliced
- 2 tbsp toasted sesame seeds
- Fresh cilantro or Thai basil optional
- Lime wedges for serving
Instructions
Step 1 — Cook the Rice
- Add rinsed rice and water to a pot or rice cooker.
- Cook until tender and fluffy.
- Fluff with a fork and keep warm.
Step 2 — Marinade the Chicken
- Combine chicken thighs with sesame oil, soy sauce, rice wine, and cornstarch.
- Toss well and marinate for 10–15 minutes.
Step 3 — Prepare the Sticky Glaze
- In a saucepan, whisk soy sauce, honey, hoisin, vinegar, ginger, garlic, and chili sauce.
- Bring to a simmer for 2–3 minutes.
- Add cornstarch slurry and cook until thick and glossy.
- Remove from heat.
Step 4 — Sear the Chicken
- Heat 1 tbsp oil in a large skillet over medium-high.
- Sear chicken pieces in a single layer until browned (about 3 minutes).
- Flip and cook another 2–3 minutes until almost cooked through.
Step 5 — Coat the Chicken in Glaze
- Pour prepared glaze over the chicken in the skillet.
- Toss and cook 1–2 minutes until sticky, shiny, and fully coated.
Step 6 — Assemble the Bowls
- Spoon warm rice into bowls.
- Add sticky glazed chicken on top.
- Arrange broccoli, carrots, and cucumbers around the bowl.
- Finish with scallions, sesame seeds, herbs, and a squeeze of lime.
Notes
- Storage:
Store chicken and rice separately for best texture. Keeps well for 3–4 days in the refrigerator. - Meal Prep:
This dish reheats perfectly — ideal for weekly meal prep. - Protein Swaps:
Substitute chicken with tofu, shrimp, or beef using the same glaze. - Heat Level:
Adjust chili garlic sauce for a spicier or milder bowl. - Glaze Fix:
Too thick? Add 1–2 tsp water.
Too thin? Simmer longer or add a small amount of slurry.