Nashville Hot Chicken Strips Recipe

If you love crunchy, juicy fried chicken with a blistering, deeply savory heat, you’re in the right place. Today I’ll walk you—step by step—through a professional chef’s approach to the Nashville Hot Chicken Strips Recipe: from brine to batter to that signature cayenne oil bath that makes Nashville hot chicken famous. This is more than just a how-to; it’s a deep-dive into technique, flavor balance, variations, tips for repeatable results, and smart serving ideas so your chicken strips land perfectly every time.
Why these are called “Nashville hot” — and why strips are brilliant
Nashville hot chicken is a Southern classic: crisp fried chicken finished with a lacquer of spicy, buttery, cayenne-forward oil. Using strips (tenders or sliced breasts) is a practical and crowd-pleasing twist—faster to cook, fantastic for dipping, ideal for sandwiches, and perfect for meal prep. The technique here preserves that signature heat-and-crisp while keeping the interior tender and juicy.
At-a-glance (yield, time, tools)
- Yield: ~4 servings (about 12–16 strips depending on size)
- Active time: 45–60 minutes (plus 4–12 hours for brine/soak if you choose)
- Total time: 1 hour (quick method) — or up to 12+ hours if brining overnight
- Key tools: heavy Dutch oven or deep fryer, instant-read thermometer, wire rack, thermometer clip (optional), shallow bowls, whisk, tongs, slotted spoon or spider
Ingredients
For the chicken and brine/marinade
- 1½–2 lb boneless skinless chicken breasts or tenderloins (or combination) — cut into 3–4″ strips
- 2 cups buttermilk (for marinade) or 1 cup buttermilk + 1 cup whole milk
- 1 tbsp hot sauce (optional, for marinade)
- 1 tsp kosher salt (if using quick brine separately; adjust if brining longer)
For the dredge (crispy coating)
- 2 cups all-purpose flour
- ¼ cup cornstarch (lightens the crust, increases crisp)
- 2 tsp baking powder (optional, adds extra lift)
- 2 tsp paprika (sweet or smoked, your choice)
- 1–2 tsp garlic powder
- 1 tsp onion powder
- 1½–2 tsp kosher salt
- 1 tsp black pepper
- 1–2 tsp cayenne pepper (adjust to taste; this is for the flour mix — final heat comes from the oil glaze)
For the wet batter (for extra adhesion and craggy crust)
- 1 cup all-purpose flour
- 1 cup cold sparkling water or cold beer (for lightness)
- 1 large egg, beaten
- 1 tsp salt
(You can skip the wet batter and do a classic triple-step: marinade → flour dredge → fry. I provide both options below.)
For frying
- Neutral oil with high smoke point (peanut, canola, sunflower, or refined avocado) — enough for 2–3″ depth in your pot (about 4–6 cups depending on pot)
For the hot oil glaze (the heart of Nashville heat)
- ½ cup (1 stick) unsalted butter (or ⅓ cup butter + 2 tbsp neutral oil for higher smoke point)
- 3–4 tbsp cayenne pepper (use less if you prefer milder; this is the heat driver)
- 1 tsp brown sugar (balances heat)
- 1 tsp smoked paprika (depth)
- ½ tsp garlic powder
- ½ tsp onion powder
- ¼–½ tsp kosher salt, to taste
- 1–2 tsp Worcestershire sauce (optional; umami)
- 1–2 tbsp hot sauce (optional, for more complex heat profile)
Garnish & serving
- Dill pickle slices (traditional)
- White bread slices (traditional)
- Lemon wedges (optional)
- Chopped green onions or parsley (for color)
- Ranch, blue cheese dressing, or honey butter for dipping
The flavor goals (what we’re balancing)
- Crisp exterior that shatters on bite.
- Juicy interior with clean chicken flavor.
- Spice glaze that’s layered: immediate heat (cayenne), mid-palate savory (Worcestershire, garlic powder), and a touch of sweetness to round the edges (brown sugar).
- Contrast with cool pickles/dairy to cut the heat.
Step-by-step preparation
1. Brine or marinade (highly recommended)
You want the strips juicy through-and-through. Brining or a buttermilk soak helps tenderize and season.
Quick brine (1–2 hours)
- Dissolve ¼ cup kosher salt in 4 cups cold water. Submerge strips, refrigerate 1–2 hours. Rinse and pat dry before proceeding.
Buttermilk marinade (preferred)
- Combine buttermilk + 1 tbsp hot sauce (optional) + 1 tsp salt. Submerge chicken and refrigerate 4–12 hours. The buttermilk tenderizes and adds tang.
If you’re short on time, even 30–60 minutes in spiked buttermilk helps.
2. Set up your stations
- Whisk the dry dredge ingredients in a wide bowl or rimmed baking dish.
- If using wet batter, whisk egg + cold sparkling water + 1 cup flour + 1 tsp salt until smooth in a second bowl.
- Place marinated chicken on a tray; let excess marinade drip before dredging.
- Heat oil to 325–350°F (163–177°C) for the first fry (lower temp to cook through). Use an instant-read thermometer — exact temps matter.
3. Dredge and rest
- For a classic double-layer crisp: pat chicken, dip in wet batter (if using), then dredge in seasoned flour. Press the flour into the surface. For even craggier crust, double-dredge (dip back in wet batter then back into flour).
- Place dredged strips on a wire rack and let rest 8–10 minutes — this helps the flour adhere and forms a better crust.
4. Frying — two-stage method for perfect crust + doneness
Professional kitchens often use a two-stage fry: lower temp to cook through, higher temp to crisp.
Stage 1 — Finish cooking at lower temp
- Heat oil to 325°F. Fry strips in small batches (don’t crowd) for ~4–6 minutes until they reach 155–160°F internal. Remove and drain on a wire rack set over a sheet pan.
Stage 2 — Crisp at higher temp
- Raise oil to 375–390°F. Return strips in batches for 45–90 seconds to crisp and color. Final internal temp should be 165°F. Rest briefly on rack while you make the glaze.
Note: If you prefer a single fry, hold oil at ~350–360°F and fry until 165°F internal — but watch for overbrowning.
5. Make the Nashville hot glaze
While the last batch fries, make your glaze:
- Melt butter slowly in a small saucepan over medium-low heat. If you’re concerned about butter burning, use 3 parts butter + 1 part neutral oil.
- Off heat, whisk in cayenne, smoked paprika, brown sugar, garlic powder, onion powder, salt, Worcestershire, and hot sauce. Taste carefully — the mixture will be spicy. Adjust for balance: more sugar if too sharp, more salt if flat.
- Bring the pan back to very low heat just to blend, but don’t boil.
6. Finish the strips
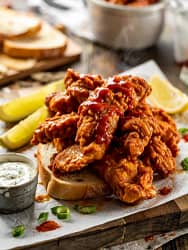
- Place fried strips on a rack or tray. Spoon or brush the glaze over each strip — a liberal coat is traditional. For intense heat, flip strips in a shallow bowl of glaze to coat both sides (do this quickly to avoid soggy crust).
- Serve immediately with pickles and white bread — the bread is there to soak up glaze and to temper heat.
Technique notes and why they matter
- Buttermilk vs. brine: Buttermilk tenderizes via lactic acid and gives a slightly tangy flavor that contrasts the cayenne. A simple brine seasons more evenly but won’t tenderize as deeply.
- Cornstarch in flour: Adds lightness and increases crispness because it absorbs less moisture than flour and produces brittle crust.
- Two-stage frying: Prevents burned crust before the interior is cooked. Lower first fry cooks meat through; higher second fry crisps.
- Resting on a rack: Keeps crust crisp. Don’t drain on paper towels (they trap steam and make skin soggy).
- Hot glaze composition: Using some butter creates that luscious, glossy mouthfeel; brown sugar tames the raw cayenne edge; Worcestershire adds umami.
How to control the heat (make it your own)
Nashville hot is famously fiery, but you can tailor it:
- Mild: Reduce cayenne in glaze by half; use smoked paprika for warmth; increase brown sugar by a teaspoon.
- Medium: Follow recipe as written (3 tbsp cayenne).
- Wildfire: Increase cayenne and add 1 tsp chipotle powder or cayenne blend; finish with a dash of ground ghost pepper only if you really know what you’re doing.
Also remember heat is subjective: the flour coating, buttermilk, and pickles will all affect perceived spiciness.
Variations & adaptations
1. Nashville Hot Chicken Thigh Strips (juicier)
Use boneless skinless chicken thighs cut into strips. Thighs tolerate longer cooking and are more forgiving.
2. Oven-baked version (lower oil)
- Preheat oven to 425°F. After dredging and spraying with oil (or brushing), bake on a wire rack for 18–22 minutes, flipping halfway; finish under broiler for 1–2 minutes to crisp. Apply glaze after baking.
3. Air fryer Nashville Hot Chicken Strips
- Preheat air fryer to 400°F. Spray strips with oil, cook in batches 10–12 minutes, flipping once. Finish with glaze after cooking.
4. Gluten-free
- Replace all-purpose flour with a 1:1 gluten-free blend for dredge; use rice flour or chickpea flour blended with cornstarch. Check binding — you may need an extra egg or a longer rest.
5. Vegetarian version (cauliflower or tempeh)
- Use cauliflower florets or thick slices of pressed tempeh. Par-cook cauliflower by blanching or air-frying first. Dredge and fry/air-fry as with chicken. Texture will differ but the glaze works wonderfully.
6. Honey butter glaze for sweet-heat
- Add 2 tbsp honey to the hot glaze or serve honey butter on the side. Classic Nashville sometimes uses honey butter for a brilliant sweet-salty contrast.
Serving suggestions (presentation + pairings)
- Traditional: Serve hot chicken strips on white bread with dill pickles. The bread and pickles are essential Nashville touches—they cut heat and add texture.
- Sandwich: Pile 3–4 strips on a toasted brioche bun with slaw and pickles. Add a smear of comeback sauce (mayo + ketchup + hot sauce + relish + spices) for extra decadence.
- Platter: Serve strips with coleslaw, mac ’n’ cheese, and candied yams for a full Southern spread.
- Appetizer: Cut strips into smaller pieces, serve with ranch, blue cheese, or a cooling yogurt-cucumber dip.
- Beverage pairings: Sweet iced tea (classic), cold lager, pilsner, or slightly sweet wheat beer. For cocktails, a bright citrus spritz or a bourbon sour cleanses the palate.
Make-ahead, storing, and reheating
- Refrigerator: Store glazed strips in airtight container up to 3 days. Reheat in a hot oven (400°F) or air fryer at 375°F for 6–8 minutes to refresh the crust. Avoid microwaving unless you don’t mind sogginess.
- Freezing: Freeze unglazed, fully cooled strips on tray until firm then bag — freeze up to 3 months. Reheat from frozen in oven or air fryer and apply glaze after reheating.
- Sauce ahead: Hot glaze stores well in fridge up to 1 week. Reheat gently on stove and whisk before using.
Troubleshooting — common problems & fixes
- Crust turned soggy after glazing: Glazing while hot can soften the crust. To minimize, brush glaze sparingly or re-crisp strips briefly in oven after glazing. Use a higher butter + oil ratio so glaze is less likely to soak in.
- Undercooked center / overbrowned exterior: Oil too hot. Use two-stage frying to solve. Use instant-read thermometer to confirm 165°F internal.
- Coating falling off: Let the dredged strips rest 8–10 minutes before frying; press flour into the surface; ensure oil temp is steady (too cold will cause coating to slough).
- Too spicy: Serve with dairy (ranch, blue cheese, yogurt-based dips) and pickles; a little sugar or honey also balances heat.
A chef’s tips — small things that make a big difference
- Cold batter trick: Use very cold sparkling water or beer in the wet batter to create a craggier, lighter crust.
- Rest time after dredge: A short rest helps the flour hydrate and adhere — don’t skip it.
- Use a thermometer: Rely on internal temps, not time. Chicken strips vary in thickness.
- Keep batches small: Overcrowding drops oil temp and yields greasy strips.
- Butter + oil combo: Pure butter tastes glorious but browns/burns; mixing with neutral oil preserves flavor and stability.
- Flavor layering: Season both the marinade and the flour — seasoning in multiple places yields deeper flavor.
- Presentation matters: A strip plated with a slice of white bread, a few pickles, and a scatter of chopped green onion feels authentic and inviting.
Frequently asked questions (FAQs)
Q: Can I use frozen chicken?
A: Thaw fully in the refrigerator first; pat dry thoroughly. Freezing changes texture slightly.
Q: Is this recipe extremely spicy?
A: The glaze is where most heat lives. You can dial cayenne up or down. If you’re serving a crowd, make a milder batch and offer extra glaze bowls for those who want a kick.
Q: Can I prepare this ahead for a party?
A: You can fry ahead and re-crisp in a hot oven right before serving, then glaze and serve immediately. Or keep unglazed strips frozen for quick reheating.
Q: Should I use skin-on chicken?
A: Strips are typically boneless and skinless. If you want to go whole bird, use bone-in pieces and adjust frying times; the glaze works the same.
Sample recipe (concise, printable)
Ingredients (serves 4):
- 1½ lb chicken tenders
- 2 cups buttermilk
- 2 cups AP flour
- ¼ cup cornstarch
- 2 tsp paprika
- 2 tsp garlic powder
- 1 tsp onion powder
- 1½ tsp salt
- 1 tsp black pepper
- 1–2 tsp cayenne (dredge)
- 1 cup AP flour + 1 egg + 1 cup cold sparkling water (wet batter, optional)
- Oil for frying (peanut/canola)
- Hot glaze: ½ cup butter + 3–4 tbsp cayenne + 1 tsp brown sugar + 1 tsp smoked paprika + ½ tsp garlic powder + dash Worcestershire + salt
Method (short): brine or buttermilk soak 4–12 hours → dredge (wet batter + dry mix) → fry 325°F until 155–160°F → crisp at 375–390°F → glaze with cayenne butter and serve with pickles and white bread.
Final thoughts from the chef
The Nashville Hot Chicken Strips Recipe is one of those dishes that looks simple on the surface but rewards attention to technique. The secret isn’t just the cayenne — it’s the balance of textures, layered seasoning, and control of oil temp. Whether you want to keep things classic or play with variations (honey butter, air-fryer, gluten-free), this core method will get you there: juicy meat, a crackling crust, and that addictive, smoky-cayenne bite.
Nashville Hot Chicken Strips Recipe
Ingredients
Chicken & Marinade
- 1½ lb about 680 g boneless skinless chicken breasts or tenders, cut into 3–4″ strips
- 2 cups buttermilk
- 1 tbsp hot sauce optional
- 1 tsp kosher salt for marinade
Dry Dredge
- 2 cups all-purpose flour
- ¼ cup cornstarch
- 2 tsp paprika sweet or smoked
- 2 tsp garlic powder
- 1 tsp onion powder
- 1½ tsp kosher salt
- 1 tsp black pepper
- 1 –2 tsp cayenne pepper adjust for heat preference
- Wet Batter optional, for extra craggy crust
- 1 cup all-purpose flour
- 1 large egg beaten
- 1 cup very cold sparkling water or cold beer
Frying
- Neutral oil with a high smoke point peanut, canola, sunflower — enough for 2–3″ depth (approx. 4–6 cups)
- Nashville Hot Glaze
- ½ cup 1 stick / 113 g unsalted butter (or ⅓ cup butter + 2 tbsp neutral oil)
- 3 –4 tbsp cayenne pepper reduce for milder
- 1 tsp brown sugar
- 1 tsp smoked paprika
- ½ tsp garlic powder
- ½ tsp onion powder
- ¼ –½ tsp kosher salt to taste
- 1 –2 tsp Worcestershire sauce optional
- 1 –2 tbsp hot sauce optional, to taste
To serve
- Dill pickle slices
- White bread slices or brioche buns
- Lemon wedges chopped green onion (optional)
- Ranch or blue cheese dressing optional
Instructions
- Marinate: Combine buttermilk, hot sauce (if using), and 1 tsp salt. Submerge chicken strips and refrigerate 4–12 hours (minimum 30–60 minutes if short on time). Drain and pat strips dry before dredging.
- Mix dry dredge: Whisk together 2 cups flour, cornstarch, paprika, garlic powder, onion powder, salt, pepper, and cayenne in a wide rimmed dish.
- Make optional wet batter: In a second bowl, whisk 1 cup flour, beaten egg, and very cold sparkling water (or beer) until smooth. Keep cold. (If skipping wet batter, simply dredge directly in seasoned flour.)
- Dredge: Remove chicken from marinade and let excess drip. For craggy crust: dip each strip into wet batter, then press into dry dredge. For extra texture, double-dredge (back into wet batter then back into dry). Place dredged strips on a wire rack and rest 8–10 minutes to set.
- Heat oil & prep: Pour oil into a heavy Dutch oven or fryer to 2–3" depth. Heat to 325°F (163°C) for the first fry. Use an instant-read thermometer for accuracy.
- First fry (cook through): Fry in small batches at 325°F for about 4–6 minutes until the strips reach 155–160°F internal. Don’t overcrowd. Transfer to wire rack to drain.
- Second fry (crisp): Increase oil temperature to 375–390°F (190–199°C). Return strips in batches for 45–90 seconds until golden and crisp. Final internal temp should be 165°F (74°C). Drain on wire rack.
- Make the glaze: In a small saucepan over very low heat, melt butter (or butter + oil). Off heat, whisk in cayenne, smoked paprika, brown sugar, garlic & onion powders, salt, Worcestershire, and hot sauce. Taste carefully and adjust balance — more sugar to tame heat, more cayenne for kick. Warm gently to incorporate, do not boil.
- Finish with glaze: Using a spoon or brush, liberally coat each hot strip with the cayenne-butter glaze. For an intense coat, quickly dunk strips into a shallow bowl of glaze (do this briefly to avoid sogginess) or brush on both sides.
- Serve immediately: Plate with white bread or buns and dill pickle slices. Offer ranch or blue cheese and lemon wedges on the side.
Notes
- Heat control: Most heat lives in the glaze. Cut cayenne by half for milder heat or increase for fiery results. Smoked paprika adds depth without extra heat.
- Buttermilk vs. brine: Buttermilk tenderizes and adds tang; a quick salt brine (1–2 hours) is a fine substitute.
- Crust tips: Cornstarch and a cold wet batter create a lighter, craggier crust. Letting dredged chicken rest on a rack for 8–10 minutes helps the coating adhere.
- Oil management: Keep batches small to maintain steady oil temperature — temperature swings cause greasy or unevenly cooked strips.
- Make-ahead & storage: Store unglazed fried strips in an airtight container in the fridge up to 3 days. Re-crisp in a 400°F oven or air fryer for 6–8 minutes before glazing. Frozen unglazed strips (flash-frozen on a tray, then bagged) keep up to 3 months.
- Oven / Air Fryer swaps: Oven: bake on a wire rack at 425°F for 18–22 minutes, finish under broiler briefly. Air fryer: 400°F for 10–12 minutes, flipping once; glaze after cooking.
- Serving ideas: Traditional with white bread & pickles; in sandwiches with slaw and comeback sauce; as party bites with dipping sauces.
- Calorie note: Calories listed below are approximate and will vary by oil absorption, portion size, and exact ingredients used.