Hot Honey Chicken Burger Recipe

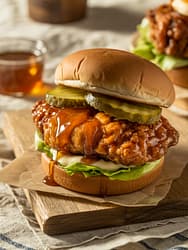
There’s something undeniably irresistible about a perfectly crisp chicken patty drizzled with a luscious, spicy-sweet hot honey glaze, layered between soft, toasted buns and topped with crisp lettuce and pickles. Welcome to my Hot Honey Chicken Burger Recipe, where Southern-inspired comfort food meets gourmet flavor. As a professional chef with years of experience developing crowd-pleasing recipes, I’m excited to share every nuance of this creation—from ingredient selection to plating tips—so you can recreate this restaurant-quality burger in your own kitchen.
In this comprehensive guide, you’ll find:
- A breakdown of each ingredient and why it matters
- Step-by-step preparation and cooking instructions
- Expert tips for achieving unbeatable texture and flavor
- Creative variations to tailor the burger to your taste
- Serving suggestions and pairing ideas
- Frequently asked questions and troubleshooting
Let’s dive in and make the ultimate Hot Honey Chicken Burger Recipe a highlight of your next meal!
Why You’ll Love This Recipe
- Flavor Balance: The sweet heat of hot honey complements the savory, juicy chicken for a perfectly balanced bite.
- Textural Contrast: Crispy breading, tender meat, crunchy lettuce, and soft buns deliver a satisfying mouthfeel.
- Customizable: Adjust the spice level, swap garnishes, or change the bun to suit any occasion.
- Impressive Presentation: Whether for a backyard barbecue or cozy weeknight dinner, this burger dazzles both the eyes and palate.
- Make-Ahead Friendly: You can prep components in advance, then assemble and fry just before serving for maximum freshness.
Ingredients & Shopping Tips
For the Chicken
- 4 boneless, skinless chicken thighs (about 6–8 oz each)
- Why thighs? Thighs stay juicier and tolerate frying better than breasts.
- 2 cups buttermilk
- Tenderizes the chicken and adds tang. If unavailable, use 2 cups whole milk + 2 Tbsp vinegar or lemon juice (let sit for 10 minutes).
- 1 tsp kosher salt, plus more for seasoning
- ½ tsp freshly ground black pepper
Breading & Frying
- 1 ½ cups all-purpose flour
- ½ cup cornstarch
- 1 Tbsp paprika (smoked or sweet, your preference)
- 1 tsp garlic powder
- 1 tsp onion powder
- ½ tsp cayenne pepper (adjust to your heat level)
- Vegetable oil, for frying (enough to fill a heavy pot or Dutch oven 2 inches deep)
Hot Honey Glaze
- ½ cup honey
- 2 Tbsp hot sauce (e.g., Frank’s RedHot or sriracha)
- 1 Tbsp unsalted butter
- Pinch of sea salt
Assembly
- 4 brioche buns, split and lightly toasted
- 4 large lettuce leaves (butter lettuce or romaine)
- 8–12 pickle slices (dill or bread-and-butter)
- Optional toppings: sliced tomato, red onion rings, avocado slices, coleslaw
Shopping Tip: Seek out local butcher or poultry farm–fresh chicken thighs for the best flavor and texture. For honey, look for raw, unfiltered varieties—these often have brighter floral notes.
Essential Equipment
- Large mixing bowls (for brining and breading)
- Heavy-bottomed pot or Dutch oven (for frying)
- Deep-fry thermometer (crucial for maintaining oil temperature)
- Wire rack set over a baking sheet (drains excess oil)
- Small saucepan (for glaze)
- Tongs and slotted spoon
Having the right tools ensures consistency and safety, especially when working with hot oil.
Preparation Steps
- Brine the Chicken
- In a large bowl, whisk together buttermilk, 1 tsp salt, and ½ tsp pepper.
- Add chicken thighs, ensuring they’re fully submerged. Cover and refrigerate for at least 2 hours (up to overnight).
- Why brine? The buttermilk’s acidity tenderizes meat and helps the breading adhere.
- Prep the Breading Station
- In a second bowl, combine flour, cornstarch, paprika, garlic powder, onion powder, cayenne, and a pinch of salt.
- Whisk thoroughly to distribute spices evenly.
- Heat the Oil
- Pour oil into your pot: about 2 inches deep (should be enough to cover chicken thighs).
- Clip on your deep-fry thermometer and heat over medium-high until 350°F (175°C).
Breading & Frying the Chicken
- Dredge the Chicken
- Remove one thigh from the buttermilk, letting excess drip back into the bowl.
- Dredge thoroughly in the flour mixture, pressing lightly so the breading adheres. Shake off any loose flour.
- Repeat for all thighs, placing them on a sheet tray.
- Fry in Batches
- Carefully lower 1–2 thighs into the hot oil (do not overcrowd).
- Fry for 5–7 minutes, flipping halfway, until golden brown and cooked through (internal temp 165°F/74°C).
- Transfer to the wire rack to drain. Season lightly with salt while still hot.
- Maintain oil temperature between 325–350°F; adjust heat as necessary.
- Keep Warm
- If frying in multiple batches, place finished thighs in a 200°F (95°C) oven to stay warm and crisp while you finish.
Making the Hot Honey Glaze
- Combine Ingredients
- In a small saucepan over low heat, melt the butter.
- Add honey and hot sauce, whisking until smooth.
- Simmer gently for 2–3 minutes, then season with a pinch of sea salt.
- Taste & Adjust
- For more heat, add an extra teaspoon of hot sauce or a pinch of chili flakes.
- For sweeter glaze, increase honey by 1–2 Tbsp.
- Keep Warm
- Transfer glaze to a small bowl; place over barely simmering water to maintain pourable consistency.
Assembling Your Burger
- Toast the Buns
- Lightly butter each bun cut-side down.
- Toast in a skillet over medium heat until golden (about 1 minute).
- Layer the Flavors
- Bottom bun: Spread a thin swipe of glaze.
- Lettuce leaf: Creates a moisture barrier and adds crunch.
- Fried chicken thigh: Generously brush with hot honey glaze.
- Pickles: Add 2–3 slices for tang.
- Optional: Tomato slice, red onion ring, avocado.
- Top bun: Drizzle extra glaze inside before closing.
- Presentation
- Skewer with a toothpick or bamboo pick to hold layers in place.
- Serve immediately for best texture contrast.
Chef’s Tips for Perfection
- Dry Before Breading: After brining, gently pat thighs with paper towels. Excess moisture creates soggy breading.
- Double Dredge: For extra-crispy texture, dip dredged chicken back into buttermilk, then one more time into the flour mixture.
- Oil Temperature Control: Use a thermometer and adjust heat to keep oil at 325–350°F; too hot burns breading, too cool makes it greasy.
- Rest Before Glazing: Let chicken rest 1–2 minutes on the rack to cool slightly so glaze clings rather than sliding off.
- Make-it-Ahead Glaze: Prepare glaze up to a day in advance and gently reheat; flavors meld and improve overnight.
- Bun Swap: Brioche is classic, but potato rolls, ciabatta, or pretzel buns each add unique character.
- Spice Customization: Replace hot sauce in glaze with sriracha, gochujang for Korean flair, or harissa for North African heat.
Creative Variations
- Sandwich Style
- Swap buns for buttermilk biscuits or cornbread muffins.
- Slaw Topping
- Add a tangy vinegar-based coleslaw for crunch and extra acidity.
- Cheesy Upgrade
- Melt Pepper Jack, Cheddar, or Queso Blanco over the chicken before glazing.
- Avocado Ranch
- Spread avocado-ranch aioli on the bun for creamy richness.
- Breakfast Twist
- Top with a fried egg and swap pickles for crispy bacon.
- Outer Spice Rub
- Add cumin, coriander, or smoked paprika to the flour mix for smoky depth.
Serving Suggestions & Pairings
- Side Dishes
- Sweet potato fries with chipotle aioli
- Onion rings with Cajun seasoning
- Classic coleslaw or potato salad
- Grilled corn on the cob
- Beverages
- IPA or Pale Ale: Hoppy notes cut through sweetness.
- Sparkling lemonade: Refreshing counterpoint to richness.
- Iced tea (sweetened or unsweetened) with a lemon wedge.
- Plating Ideas
- Serve burgers on a wooden board lined with parchment paper.
- Garnish with a sprig of fresh thyme or a small ramekin of extra glaze.
Storage & Reheating
- Chicken: Store plain fried chicken (without glaze) in an airtight container in the fridge for up to 3 days.
- Glaze: Keep in a sealed jar in the fridge for up to 1 week; gently reheat before using.
- Reheating: To revive crispiness, place chicken on a wire rack over a baking sheet and bake at 375°F for 8–10 minutes.
Assembling the burger just before serving ensures the buns don’t become soggy.
Frequently Asked Questions
- Can I grill the chicken instead of frying?
- Yes! Marinate thighs in buttermilk, season with the flour mixture, then grill over medium-high heat for 6–8 minutes per side. Brush with glaze in the last minute of cooking.
- What’s the best honey to use?
- Raw, unfiltered honey has the most pronounced flavor. Clover or wildflower honey pairs beautifully with spicy heat.
- How spicy is this burger?
- Moderately spicy—adjust cayenne and hot sauce to taste. For less heat, halve the hot sauce and skip the cayenne.
- Can I make this gluten-free?
- Substitute a 1:1 gluten-free flour blend and gluten-free cornstarch. Double-check that your hot sauce and buns are certified gluten-free.
- Is there a vegetarian alternative?
- Try breaded cauliflower steaks or portobello mushroom caps in place of chicken. Follow the same breading and glazing steps.
Conclusion
This Hot Honey Chicken Burger Recipe brings together the best of sweet, spicy, and crunchy textures in one mouthwatering package. With detailed instructions, chef’s tips, and versatile variations, you’re equipped to make these burgers shine at your next gathering—or simply elevate your weeknight dinner routine.
Give this recipe a try, share your results, and don’t hesitate to tweak the heat level and toppings to make it uniquely yours. When you master the balance of crisp chicken, sticky hot honey glaze, and fresh accompaniments, you’ve unlocked the secret to an unforgettable burger.
Happy cooking, and may your kitchen always be filled with the irresistible aroma of hot honey goodness!
Hot Honey Chicken Burger Recipe
Ingredients
For the Chicken:
- 4 boneless skinless chicken thighs (6–8 oz each)
- 2 cups buttermilk
- 1 tsp kosher salt
- ½ tsp freshly ground black pepper
Breading Mix:
- 1½ cups all‑purpose flour
- ½ cup cornstarch
- 1 Tbsp paprika
- 1 tsp garlic powder
- 1 tsp onion powder
- ½ tsp cayenne pepper
- Pinch of kosher salt
Hot Honey Glaze:
- ½ cup raw honey
- 2 Tbsp hot sauce Frank’s RedHot or sriracha
- 1 Tbsp unsalted butter
- Pinch of sea salt
Assembly:
- 4 brioche buns split and lightly toasted
- 4 large lettuce leaves butter or romaine
- 8 –12 pickle slices
- Optional: tomato slices red onion rings, avocado
Instructions
- Brine Chicken: In a bowl, whisk buttermilk, salt, and pepper. Submerge chicken, cover, and refrigerate 2 hours (or overnight).
- Prep Breading: In a separate bowl, whisk together flour, cornstarch, paprika, garlic powder, onion powder, cayenne, and salt.
- Heat Oil: Fill a heavy pot or Dutch oven with 2 inches of vegetable oil. Heat to 350 °F (175 °C), using a deep‑fry thermometer to monitor.
Dredge & Fry:
- Pat thighs dry, then dip each into the flour mix, pressing to adhere.
- Fry 1–2 pieces at a time for 5–7 minutes, turning once, until golden and internal temperature reaches 165 °F.
- Drain on a wire rack; season lightly with salt. Keep warm in a 200 °F oven if needed.
- Make Glaze: In a small saucepan over low heat, melt butter. Whisk in honey and hot sauce; simmer 2–3 minutes. Season with sea salt.
- Toast Buns: Butter and toast cut‑sides of buns in a skillet until golden, about 1 minute.
Assemble Burgers:
- Spread a thin layer of glaze on bottom buns.
- Layer lettuce, fried chicken (brush generously with glaze), pickles, and any optional toppings.
- Drizzle extra glaze inside top buns, close burgers, and serve immediately.
Notes
- Tip: Pat chicken dry before dredging to ensure extra‑crispy breading.
- Make‑Ahead: Brine chicken up to 24 hours ahead; glaze can be prepared and chilled, then gently reheated.
- Storage: Store cooked chicken (unglazed) in an airtight container up to 3 days; re-crisp in a 375 °F oven for 8–10 minutes.
- Variations: Try coleslaw topping, pepper jack cheese, or swap buns for buttermilk biscuits for a brunch twist.