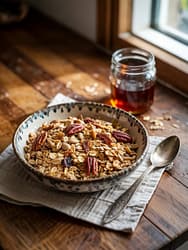
Homemade Maple Cinnamon Granola Recipe

If you love the warm, cozy aroma of cinnamon and the deep, caramel sweetness of real maple syrup, you’re in the right place. This Homemade Maple Cinnamon Granola Recipe is crunchy, slightly chewy, and endlessly adaptable — perfect for spooning over yogurt, stirring into milk, topping smoothie bowls, or munching straight from the jar. I’ll walk you through everything: exact ingredients (with metric and imperial measures), step-by-step baking, troubleshooting tips, tasty variations, storage, and creative serving ideas. Ready? Let’s make your kitchen smell amazing.
Why make granola at home?
Store-bought granolas can be convenient, but homemade granola wins on several counts:
- You control the ingredients. Use real maple syrup, choose your favourite nuts, and avoid unnecessary preservatives and refined oils.
- Customizable texture and flavor. Want larger clusters? More spice? Add toasted coconut? You decide.
- Fresher flavor. Homemade granola tastes brighter and less “processed” than many bagged versions.
- Cost-effective. Buying base ingredients in bulk and tailoring add-ins saves money over time.
- Great for gifts. Fill mason jars with warm granola and tie with a ribbon for a thoughtful, homemade present.
This Homemade Maple Cinnamon Granola Recipe is especially good because it balances maple’s caramel notes with warming cinnamon, giving a nostalgic, breakfast-bowl feel without being overly sweet.
Ingredients
This recipe yields about 8–10 cups (roughly 1.6–2 liters) of granola — enough for several breakfasts or a few jars to gift.
Dry ingredients:
- 4 cups (360 g) old-fashioned rolled oats (not instant). Use gluten-free oats if needed.
- 1 cup (100 g) chopped nuts (almonds, pecans, or walnuts). See variation notes.
- ½ cup (45 g) raw sunflower seeds or pumpkin seeds (pepitas).
- ½ cup (40 g) unsweetened shredded coconut (optional).
- 2 tablespoons ground cinnamon (adjust to taste).
- 1 teaspoon fine sea salt.
- 1 teaspoon ground ginger or a pinch of freshly ground nutmeg (optional, for warmth).
Wet ingredients:
- ⅔ cup (160 ml) pure maple syrup (grade A or equivalent).
- ⅓ cup (80 ml) neutral oil (avocado oil, light olive oil, or melted coconut oil). Can reduce slightly for crunchier texture—see tips.
- 2 teaspoons pure vanilla extract.
Optional mix-ins (add after baking):
- 1 cup (150 g) dried fruit (raisins, cranberries, cherries, or chopped apricots).
- ¼–½ cup (80–120 g) chocolate chips (add when granola is completely cool to keep chips from melting).
- Additional ½ cup (50 g) chopped nuts for cluster formation, if you like extra lumps.
Notes:
- If you prefer a less sweet granola, reduce maple syrup to ½ cup (120 ml) and add 1–2 tablespoons of warm water to help coat the dry ingredients.
- For a vegan granola, ensure add-ins (like chocolate chips) are dairy-free.
Equipment you’ll need
- Large mixing bowl
- Measuring cups and spoons (or kitchen scale for accuracy)
- Wooden spoon or silicone spatula
- Rimmed baking sheet(s) — at least one 18×13 in (US half sheet) or two smaller sheets
- Parchment paper or silicone baking mat (for easy cleanup)
- Oven thermometer (optional but helpful for precise baking)
- Airtight jars or containers for storage
Step-by-step method
1. Preheat and prepare
Preheat your oven to 325°F (160°C). Line a rimmed baking sheet with parchment paper or a silicone mat. If you’re making a larger batch, use two sheets and rotate them halfway through baking.
2. Mix dry ingredients
In a large bowl, combine the oats, chopped nuts, seeds, shredded coconut (if using), cinnamon, salt, and any other dry spices. Toss gently so everything is evenly distributed.
3. Combine wet ingredients
In a small bowl or measuring cup, whisk together the maple syrup, oil, and vanilla extract until smooth. The maple syrup should mix easily with the oil; if using a thicker maple grade, warm it slightly (10–15 seconds in the microwave) to thin it.
4. Coat the dry mix
Pour the wet mixture over the dry ingredients. Using a spatula, fold everything together until the oats and nuts are well coated with the maple mixture. This step is crucial — evenly coated clusters cake together in the oven and develop that desirable golden color.
5. Spread on baking sheet
Spread the mixture into an even layer on the prepared baking sheet. For larger clusters, press down slightly with the back of your spatula or a piece of parchment. Thicker layers reduce crisping speed; aim for a ½-inch to ¾-inch thickness for even baking.
6. Bake (low and slow)
Bake at 325°F (160°C) for 18–25 minutes, checking and stirring every 7–8 minutes. For a more uniform golden color and crunchy texture, gently toss the granola once or twice during baking. If you want bigger clusters, avoid stirring too often — only flip the pan once.
Watch the edges closely; nuts brown faster than oats. Remove the sheet when the granola is golden and fragrant (a few slightly darker pieces are okay).
7. Crisping and cooling
Transfer the granola to a cooling rack or leave it on the sheet. For clumpier granola, press it down immediately after removing from the oven and resist stirring while cooling; the sugar will set and form clusters. Let it cool completely — cooling both crisps the granola and finishes the cluster formation.
8. Add mix-ins
Once cooled, stir in dried fruits and chocolate chips if using. Wait until fully cooled before adding chocolate so the chips don’t melt.
9. Store
Place cooled granola into airtight glass jars or containers. Stored at room temperature, this granola will stay fresh for 2–3 weeks; freeze for up to 3 months (see storage section for details).
Tips for perfect granola every time
- Use old-fashioned rolled oats, not quick oats. Rolled oats retain texture and provide the best mouthfeel.
- Low and slow is the key. Bake at a moderate temperature (325°F/160°C) rather than high heat to get even browning without burning.
- Stir gently if you want smaller pieces; stir less for larger clusters. Pressing the granola down after baking produces the biggest clusters.
- Oil helps the mouthfeel and crispness. If you want lighter granola, reduce oil to ¼ cup and add 2–3 tablespoons of apple sauce — note texture will be different.
- Sweetness control. Maple syrup is the star here; if you want less sugar, drop to ½ cup and increase salt to 1¼ teaspoons to balance flavour, or add 1–2 tablespoons of mashed banana for natural sweetness (bakes differently).
- Avoid overcrowding the pan. Spread granola thinly and use two pans if necessary to ensure even baking.
- Rotate pans and racks. If using two trays, switch their positions halfway through to ensure even heat exposure.
- Check early and often. Granola can go from golden to burnt quickly; smell is a good indicator — it should smell toasty and warm.
- For toasted nuts, pre-toast nuts separately for 5–7 minutes before mixing in for extra depth (watch them closely).
- For clumps, reduce stirring frequency and press the baked granola into the pan with a spatula or bottom of a measuring cup while it cools.
Troubleshooting common issues
- Granola is soggy: It wasn’t baked long enough or was stored before fully cooling. Return to the oven at 300°F (150°C) for 5–10 minutes, stirring once, then cool completely before storing.
- Granola is too sweet: Reduce maple syrup next time by 1/4–1/3. Add unsweetened coconut, more plain oats, or a pinch extra salt to balance sweetness.
- Clusters aren’t forming: Too much stirring while warm prevents clusters. Also, ensure there’s enough sticky binder (maple syrup + oil). Press the granola firmly while it cools to form clusters.
- Some pieces browned faster: Nuts and coconut brown faster than oats. Mix them in later in the bake or reduce oven temp slightly and bake longer.
- Granola burns at edges: Your oven might run hot; use an oven thermometer and reduce temp by 10–15°F (5–8°C) if needed. Use a lighter-colored baking sheet to reduce overheating.
Flavour variations (use this recipe as a base)
This recipe is a brilliant base — tweak it!
- Nutty Maple Cinnamon Granola
Swap the 1 cup mixed nuts for ½ cup chopped almonds + ½ cup chopped hazelnuts. Add 1 teaspoon almond extract (replace half the vanilla) for a nutty lift. - Maple Cinnamon & Apple Granola
Add ½ cup finely chopped dehydrated apple and 1 teaspoon ground cardamom. Add apples after baking. - Chocolate Maple Cluster Granola
Mix in ½ cup Dutch-process cocoa into the dry ingredients and add up to ½ cup chocolate chips after cooling. You may want to reduce cinnamon to 1 tablespoon. - Tropical Maple Coconut Granola
Increase shredded coconut to 1 cup, add macadamia nuts (½ cup), and stir in ½ cup dried pineapple chunks after baking. - Pumpkin Spice Granola
Replace some of the cinnamon with 1 teaspoon pumpkin pie spice and add ¼ cup pumpkin seeds (pepitas). - Nut-Free & Seed-Heavy
Replace nuts with an extra ½ cup seeds (pumpkin + sunflower) and ¼ cup toasted buckwheat groats for crunch. - Low Sugar / Sugar-Free-ish
Use ½ cup pure maple syrup + 2 tablespoons erythritol or monk fruit sweetener (baking-safe) for reduced sugar — baking properties change slightly. - Granola Bars
Press the mixture into a lined 9×13 pan before baking (about 1 inch thick), bake 25–30 minutes, cool completely, then cut into bars.
When to add what: timing for mix-ins
- Before baking: Oats, raw nuts, seeds, shredded coconut (if you want it toasted), and spices.
- During the last 5 minutes (optional): Add small, heat-stable pieces like chopped hazelnuts for extra color, but generally avoid adding delicate mix-ins mid-bake.
- After baking & cooled: Dried fruit, chocolate chips, chia seeds (for texture), yogurt chips, freeze-dried fruit.
Adding dried fruit before baking can result in tougher, leathery fruit unless the fruit is specifically dehydrated for baking. For soft chewy pieces, add them after baking.
Serving suggestions
This Homemade Maple Cinnamon Granola Recipe is versatile. Try these:
- Classic yogurt parfait: Layer Greek yogurt, a drizzle of honey, fresh berries, and granola.
- Milk and granola: Pour cold milk over granola for a crunchy cereal alternative.
- Smoothie bowl topper: Spoon granola over smoothie bowls for texture.
- Baked apple crumble boost: Use granola instead of or in addition to traditional crumble topping.
- Ice cream crunch: Sprinkle over vanilla or caramel ice cream with a warm drizzle of maple.
- Trail snack: Mix granola with extra nuts and a few chocolate chips for an on-the-go snack.
- Breakfast salad: Toss granola with sliced bananas, diced apples, and a spoon of nut butter for a quick energy bowl.
Pairings: tangy Greek yogurt, milk (dairy or plant), fresh fruit (bananas, berries, pear), or a smear of almond butter.
Storage & shelf life
- Room temperature: Store in airtight jars or containers in a cool, dry pantry for 2–3 weeks. Keep away from direct sunlight.
- Refrigerator: Refrigeration can prolong freshness to about 6–8 weeks, but granola may lose some crispness — bring to room temp to regain crunch.
- Freezer: Seal granola in freezer-safe bags or containers and freeze for up to 3 months. Thaw at room temperature; if moisture forms, re-crisp in the oven at 300°F (150°C) for 5–8 minutes.
Label jars with the date for best tracking. If you live in a humid climate, prefer refrigeration or freezer storage to prevent losing crunch.
Nutrition estimate (approximate)
Estimate per ½ cup serving (about 60–70 g):
Calories: ~300–360 kcal
Fat: 14–18 g (mostly from nuts and oil)
Carbohydrates: 36–42 g (maple syrup, oats, dried fruit if included)
Fiber: 4–6 g
Protein: 6–8 g
These are approximate and vary widely with mix-ins (nuts vs. seeds vs. dried fruit). If you need precise nutrition facts for dietary reasons, use a nutrition calculator and input your exact ingredients and quantities.
Make-ahead, gifting, and presentation ideas
- Gift jars: Fill clean mason jars with granola, add a handwritten label with the name and date (e.g., “Homemade Maple Cinnamon Granola — Baked Jan 26, 2026”), and tie a ribbon. Add recipe card instructions for serving.
- Breakfast baskets: Combine a jar of granola with a small bottle of pure maple syrup, a bag of quality coffee, and a wooden spoon for a lovely host gift.
- Party favors: Small cellophane bags or paper cones tied with twine make charming favors.
- Labeling: Include allergen info (e.g., contains nuts) if gifting.
FAQs
Q: Can I make this gluten-free?
A: Yes — use certified gluten-free oats and ensure your add-ins (like chocolate chips or coconut) are labeled gluten-free.
Q: How do I make bigger clusters?
A: Press the baked granola into the pan and let it cool completely without stirring. Use slightly more syrup or a tablespoon of egg white (not for vegans) to bind if needed.
Q: Can I use honey instead of maple syrup?
A: Yes, but the flavor will change (honey is different). Honey may brown faster — consider reducing oven temperature slightly and monitoring closely.
Q: Is coconut oil okay to use?
A: Melted coconut oil works well and adds subtle flavor. Use fractionated (liquid) coconut oil if you don’t want a coconut taste. Keep in mind coconut oil solidifies at room temperature; this can help create clusters when the granola cools.
Q: My granola got burnt — can I salvage it?
A: Remove the burnt pieces and taste test. Slightly darker oats are okay, but if there’s an unpleasant burnt flavour, it’s best to scrap that batch and start fresh.
Final notes — why this maple cinnamon granola stands out
This Homemade Maple Cinnamon Granola Recipe balances cozy nostalgia with fresh, intentional ingredients. Pure maple syrup brings nuanced sweetness and caramel notes that pair beautifully with cinnamon’s warmth. The recipe’s flexibility lets you use what you have on hand — swap nuts, fold in seeds, or go tropical with dried fruit — while still achieving a dependable crunchy texture.
If you only remember one piece of advice: low and slow + press to cluster. Bake gently, watch closely, and let it cool completely. That’s how you get beautiful golden clusters and the perfect crunch.
Homemade Maple Cinnamon Granola Recipe
Ingredients
- 4 cups old-fashioned rolled oats
- 1 cup chopped nuts almonds, pecans, or walnuts
- ½ cup sunflower seeds or pumpkin seeds
- ½ cup unsweetened shredded coconut optional
- 2 tablespoons ground cinnamon
- 1 teaspoon fine sea salt
- ⅔ cup pure maple syrup
- ⅓ cup neutral oil avocado oil, light olive oil, or melted coconut oil
- 2 teaspoons vanilla extract
- Optional Add-ins after baking:
- 1 cup dried fruit cranberries, raisins, or cherries
- ¼ –½ cup chocolate chips
Instructions
- Preheat oven to 325°F (160°C) and line a baking sheet with parchment paper.
- In a large bowl, mix rolled oats, nuts, seeds, coconut (if using), cinnamon, and salt.
- In a separate bowl, whisk together maple syrup, oil, and vanilla extract.
- Pour the wet mixture over the dry ingredients and mix well until evenly coated.
- Spread the mixture evenly on the prepared baking sheet and gently press it down for clusters.
- Bake for 18–25 minutes, stirring once halfway through for even browning.
- Remove from oven when golden and fragrant. Press gently again for larger clusters.
- Allow the granola to cool completely without stirring.
- Once cooled, mix in dried fruit or chocolate chips if desired.
- Store in an airtight container.
Notes
- Storage: Store in an airtight container at room temperature for up to 3 weeks or freeze for up to 3 months.
- For bigger clusters: Avoid stirring too much and press the granola down while cooling.
- Less sweet option: Reduce maple syrup to ½ cup and add 1–2 tablespoons of water.
- Variations: Add pumpkin spice, cardamom, cocoa powder, or swap nuts and seeds based on preference.
- Vegan & dairy-free: Naturally vegan when using dairy-free chocolate chips.