Golden Southern Honeycomb Candy Recipe

Imagine biting into a piece of candy that crackles like a frozen lake under your teeth, melts into buttery honeyed sweetness, and leaves you reaching for more. That’s the magic of honeycomb — and in this post I’ll walk you through a complete, chef-tested Golden Southern Honeycomb Candy Recipe: the how-to, the why, the alternatives, and every pro tip I’ve collected in years of pastry work. Whether you’re making this as a gift, a garnish for ice cream, or the star of a Southern-inspired dessert plate, you’ll leave with beautiful, stable honeycomb that tastes as good as it looks.
I’m a professional chef who loves transforming pantry-staple sugar into show-stopping confections. In this post you’ll find clear step-by-step instructions, troubleshooting advice, and creative variations so you can confidently make this golden treat at home.
What is honeycomb candy — and why “Golden Southern”?
Honeycomb candy (also called sponge toffee, hokey pokey, or cinder toffee) is a light, aerated candy created by trapping carbon dioxide bubbles inside a hot sugar syrup with the sudden addition of a leavening agent (baking soda). The result is a crunchy, foamy structure with a delicate honeyed flavour and an irresistible crunch.
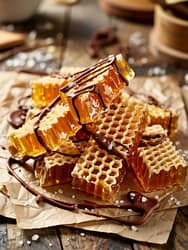
When I say Golden Southern Honeycomb Candy Recipe, I’m talking about a version that leans into the warm, floral character of Southern honey — think wildflower or clover — while keeping the candy a bright golden color and clean flavor. The Southern twist is mostly in flavoring (local honey, a whisper of bourbon or toasted pecans if you like) and presentation (rustic shards, chocolate-dipped for contrast). The technique, however, remains straightforward and focused on temperature control and timing.
Why make this at home?
- It’s impressive but surprisingly simple.
- Uses pantry staples and minimal equipment.
- Great for gifts: jars of shards wrapped with ribbon look gorgeous.
- Versatile — crumbles beautifully over ice cream, cakes, and parfaits.
- Makes a wonderful contrast to creamy textures (vanilla ice cream, panna cotta).
Ingredients (classic Golden Southern batch — makes about 12–16 medium shards)
All measurements given in cups and grams. This recipe is forgiving but weighing ingredients will yield the most reliable results.
- Granulated sugar — 200 g (1 cup)
- Light corn syrup or golden syrup — 60 ml (¼ cup)
(Golden syrup gives a more “butterscotch” rounded note; corn syrup is neutral and prevents crystallization.) - Mild honey (Southern wildflower or clover recommended) — 60 ml (4 tbsp / ¼ cup)
(Use good-quality honey — it’s a flavour star here.) - Water — 45 ml (3 tbsp)
- Fine sea salt — ¼ tsp
- Baking soda (sifted) — 2 tsp (approx. 8–10 g)
(This creates the bubbles that form the honeycomb structure.) - Vanilla extract — ½ tsp (optional, but recommended)
- Unsalted butter — 1 tbsp (optional, for finishing melted chocolate or to brush pan; do not cook in the syrup)
- Chocolate for dipping (optional) — 100–150 g (dark or milk, as preferred)
Chef note: If you prefer a dairy-free/vegan version, replace honey with an additional 60 ml of golden syrup and avoid butter/chocolate that contains milk.
Equipment you’ll need
- Heavy-bottomed saucepan (2–3 quart) — minimizes hot spots.
- Candy thermometer (instant-read or clip-on) — highly recommended for accuracy.
- Whisk or heatproof spatula.
- Large metal or heatproof bowl for mixing baking soda (optional — I prefer to keep baking soda ready in a small sieve).
- Baking sheet lined with parchment paper or a silicone mat (silpat).
- Measuring cups/spoons and a kitchen scale (for best results).
- Oven mitts and a ladle or sturdy spoon.
- A second tray or cutter if you plan to cut the honeycomb into uniform shapes.
Safety note: Boiling sugar is extremely hot (well above 100°C / 212°F). Keep children and pets away during cooking, and be cautious when adding baking soda — the mixture foams violently.
Step-by-step method
I break the process into three phases: syrup, activation (baking soda), and cooling/finishing.
1. Prep your workspace (5–10 minutes)
- Line a baking sheet with parchment or a silicone mat. Lightly butter the parchment (or spray with nonstick spray) so the honeycomb releases cleanly. Set nearby.
- Measure and have all ingredients ready. Once your syrup hits target temperature you’ll need to move fast.
- Keep your sifted baking soda in a small bowl and a whisk or spatula within reach.
Chef tip: Baking soda causes an explosive foam the moment it’s added. Have the sheet close so you can immediately pour the foaming mixture onto it.
2. Make the syrup (8–12 minutes)
- Combine the sugar, golden/corn syrup, honey, water, and salt in the heavy-bottomed saucepan. Give it a gentle stir to moisten the sugar, but stop stirring after it begins to heat — stirring can encourage crystals to form.
- Attach the candy thermometer so it reads accurately in the syrup (but not touching the bottom of the pan). Heat over medium-high heat.
- Allow the mixture to come to a steady boil. If stray sugar crystals form on the sides, wet a pastry brush and wash them down with a little water — this reduces risk of crystallization.
- Continue cooking until the mixture reaches 300°F (149°C) — the hard crack stage. This usually takes 8–12 minutes depending on your stove and pan. The syrup should be a rich, golden amber — not too dark (avoid reaching 320°F/160°C or above, which gives a burnt taste).
No thermometer? Look for the syrup to turn deep golden and produce large, vigorous bubbles. Use caution — visual cues are rough.
Chef tip: If the syrup reaches color you like but the thermometer is a little shy of 300°F, you can keep an eye on it and remove from heat at 295–300°F. Erring on the cooler side preserves the bright honey notes and golden color.
3. Activate with baking soda — create the foam (30–60 seconds)
- Remove the pan from heat immediately when the syrup hits 300°F (149°C). Let the boil calm for a second — but act quickly.
- Sift the 2 tsp of baking soda into a small bowl (this avoids lumps). Add the baking soda to the hot syrup and immediately whisk briskly. The mixture will foam up quickly and increase in volume — this is precisely what we want.
- Stir in ½ tsp vanilla at this point if using. Work quickly and confidently — the activated foam must be poured while hot and aerated.
Chef tip: Pour the baking soda in a slow, steady stream while whisking to create uniform, fine bubbles. Avoid dumping it all at once without whisking — lumps will create dense pockets.
4. Pour and set (3–5 minutes)
- Immediately pour the foaming honeycomb onto the prepared parchment or silicone mat. Do not spread or press it — allowing it to settle naturally retains airy pockets. You can tilt the pan slightly if you want a thicker or thinner spread.
- Let it sit, undisturbed, at room temperature until completely cool and hard — about 30–60 minutes depending on thickness and humidity.
Important: Do not refrigerate. Rapid cooling can cause condensation and sogginess.
5. Break and finish (5–10 minutes)
- Once fully cooled, lift the parchment and break the honeycomb into shards using your hands or the back of a knife for clean edges. If you want uniform pieces, score lines gently while still slightly warm, but be careful — it’s fragile.
- For chocolate-dipped honeycomb, melt chocolate in a double boiler or microwave (stir every 20–30 seconds). Dip pieces halfway, place on parchment, and allow to set. Sprinkle with flaky sea salt or crushed toasted pecans if desired.
Troubleshooting — common issues and fixes
- Syrup crystallizes (becomes grainy): This is caused by sugar crystals on pan sides or excessive stirring. Next time, wash down the sides with a wet brush and avoid stirring after boiling starts. Use a clean pan and utensils.
- Foam collapses / dense candy: Likely under cooked syrup (too much moisture) or delayed baking soda addition. Ensure syrup reaches ~300°F (149°C) and add baking soda immediately off the heat.
- Bitter or burnt flavour: Syrup was overcooked. Remove from heat at or just below 300°F to keep flavour bright.
- Sticky/humid honeycomb: High humidity will soften honeycomb quickly. Store immediately in an airtight container with silica packet (food-safe) or in a dry cupboard. Avoid the fridge — condensation ruins the crispness.
- Baking soda clumping: Sift it first and whisk vigorously when you add it.
Chef’s pro tips for consistent success
- Use a good candy thermometer. It’s the difference between chewy and crisp.
- Heavy-bottomed stainless pans heat evenly; avoid thin pans that burn the syrup.
- Keep the workspace clean and prepped. Once the syrup reaches temperature, everything moves fast.
- Golden color vs flavor: If you want a brighter golden color and firmer honey flavor, remove the syrup at the slightly lower end of the hard crack stage (295–300°F). For deeper caramel notes, go a touch higher but beware bitterness.
- If you prefer a softer, almost sponge-like texture (less glassy crunch), reduce final temperature by 5–10°F — but this reduces shelf-stability.
- If your honeycomb seems too fragile or shatters like glass, try a touch less final temperature or add 1 tsp more honey (up to preference) for flexibility.
Variations — Southern-inspired and creative twists
The beauty of the Golden Southern Honeycomb Candy Recipe is how well it plays with flavors. Here are variations I often experiment with:
- Bourbon-Pecan Honeycomb
- Add 1 tbsp finely chopped toasted pecans and 1 tbsp bourbon into the syrup toward the end of cooking (be careful — alcohol ignites if flambeed; add off heat). Or sprinkle toasted pecans on chocolate-dipped pieces.
- Chocolate-Dipped Southern Honeycomb
- Dip shards into tempered dark chocolate for a classic contrast. Dust with flaky sea salt and a tiny grating of orange zest.
- Sea Salt & Citrus
- Top freshly dipped chocolate with a pinch of flaky sea salt and very fine lemon or orange zest for brightness.
- Coffee & Cocoa
- Stir in 1 tsp instant espresso dissolved in the water at the start and sprinkle cocoa powder on dipped edges for mocha notes.
- Spiced Honeycomb (Autumnal)
- Add ⅛–¼ tsp ground cinnamon and a pinch of nutmeg to the dry sugar before heating. Keep in mind spices can darken the candy.
- Vegan Golden Honeycomb
- Replace honey with an extra 60 ml golden syrup; ensure all coating chocolate is dairy-free. The texture will be very similar.
- Nutty Peanut Swirl
- Drizzle melted peanut butter over set shards and press lightly to adhere.
- Matcha Honeycomb
- Dust with matcha powder before chocolate sets for a green-tea twist.
Serving ideas and recipe uses
- Simple snack: Serve shards on a pretty platter — they’re candy-table ready.
- Ice cream topper: Crumble over vanilla or salted caramel ice cream for crunch and flavor contrast.
- Dessert garnish: Use as a crunchy crown for panna cotta, mousse, or chocolate tart.
- Cocktail accompaniment: Pair with a bourbon cocktail; the honey notes harmonize wonderfully.
- Gift jars: Layer shards in airtight jars with parchment; tie with a ribbon and label.
- Biscuit or cake inclusion: Fold small crumbles into cookie dough or sprinkle on buttercream as a crunchy decoration.
Chef’s pairing note: The bright, sweet honey flavors pair exceptionally well with rich, creamy elements (vanilla bean ice cream, mascarpone), as well as strong bittersweet chocolate and aromatic spirits like rye or bourbon.
Storage and shelf life
Honeycomb is hygroscopic — it loves to absorb moisture. Follow these storage tips to preserve crispness:
- Store at room temperature in an airtight container with as little head space as possible.
- Keep in a dry place away from sunlight and heat.
- Use within 1–2 weeks for best texture. In very dry climates honeycomb can keep up to a month; in humid climates it may soften within days.
- Do not refrigerate — condensation ruins the crunch.
- If storing for gifting, include a small food-grade desiccant packet if available.
Safety & allergy notes
- Boiling sugar reaches extremely high temperatures and can cause severe burns. Wear oven mitts, be cautious when pouring, and keep kids and pets away.
- This recipe contains honey and potentially dairy (if you use butter or milk chocolate). Note: honey is not recommended for infants under 12 months.
- If you top or dip with nuts, clearly label for nut allergies.
Scaling, altitude adjustments, and troubleshooting by environment
- Scaling: Multiply ingredients by volume carefully — it’s easier to scale by weight (e.g., 200 g sugar : 60 ml syrup : 60 ml honey : 45 ml water). Larger batches will take longer to heat; use a proportionally larger, heavy-bottomed pan.
- Altitude: At high altitudes boiling points drop. Candy temperatures will need adjustment (reduce target candy thermometer temp by about 2–4°F per 1,000 feet above sea level). If you’re above 3,000 ft, check local candy-temperature charts or reduce by ~5–10°F. If unsure, rely on visual and textural cues, and test a small drop in cold water to check for the hard crack stage.
- Humidity: On rainy or humid days, expect softer results. Consider making honeycomb on dry days for best texture, or plan to gift/serve immediately.
A final word from the kitchen
The Golden Southern Honeycomb Candy Recipe is one of those deceptively simple confections that rewards attention to detail. Temperature control, swift handling, and a little planning will give you delicate, golden shards that sing with honey flavour. Keep practicing — the first batch might be a little experimental; by the second you’ll be confident adjusting thickness, color, and flavour to your taste.
Golden Southern Honeycomb Candy Recipe
Ingredients
- 1 cup 200 g granulated sugar
- ¼ cup 60 ml light corn syrup or golden syrup
- ¼ cup 60 ml mild Southern honey (wildflower or clover)
- 3 tablespoons water
- ¼ teaspoon fine sea salt
- 2 teaspoons baking soda sifted
- ½ teaspoon vanilla extract optional
- Optional for finishing: melted dark or milk chocolate flaky sea salt, chopped nuts
Instructions
Prepare the Pan:
- Line a baking sheet with parchment paper or a silicone baking mat. Lightly grease if needed and set aside.
Make the Syrup:
- In a heavy-bottomed saucepan, combine sugar, corn or golden syrup, honey, water, and salt. Heat over medium-high heat until fully dissolved and bubbling. Do not stir once boiling begins.
Cook to Hard Crack Stage:
- Continue cooking until the syrup reaches 300°F (149°C) on a candy thermometer and turns a rich golden color.
Add Baking Soda:
- Remove the pan from heat. Immediately whisk in the sifted baking soda (and vanilla, if using). The mixture will rapidly foam and expand.
Pour and Set:
- Quickly pour the foaming mixture onto the prepared baking sheet. Do not spread—allow it to naturally expand and settle.
Cool Completely:
- Let the honeycomb cool at room temperature for 30–60 minutes until fully hardened.
Break and Finish:
- Break into rustic shards. If desired, dip or drizzle with melted chocolate and sprinkle with flaky sea salt or nuts. Allow chocolate to set before serving.
Notes
- Storage: Store in an airtight container at room temperature in a dry place. Avoid refrigeration, as moisture will soften the candy.
- Shelf Life: Best enjoyed within 1–2 weeks.
- Variations: Add a touch of bourbon, citrus zest, or spice (like cinnamon) for a Southern twist.
- Humidity Tip: Honeycomb softens quickly in humid conditions—make and store on dry days for best results.