Easy Sushi Balls Recipe

If you love sushi but dread the rolling, the mat-cleanup, or the idea of perfect, concertina-like rice, then this Easy Sushi Balls Recipe is your new best friend. Sushi balls (also called sushi bombs, sushi domes, or temari sushi when in small, hand-formed shapes) are playful, elegant, and infinitely adaptable. They deliver the same textures and flavours as classic sushi—vinegared rice, fresh fish or vegetables, savory sauces, and crunchy toppings—without complicated techniques. In this post I’ll walk you through everything: ingredients, tools, step-by-step instructions, tips for perfect rice, variations (vegan, party platters, spicy, baked), presentation ideas, storage, and troubleshooting. Whether you’re cooking for a weeknight dinner or assembling a stunning party platter, this Easy Sushi Balls Recipe will make you look like a pro.
Why sushi balls?
Sushi balls are approachable. They’re forgiving of imperfect shaping, fast to assemble, and immediately Instagrammable. Because they’re formed with a mold or your hands, they’re excellent for:
- Beginners who want classic sushi flavours without proficiency at rolling.
- Home cooks who want attractive bite-sized or dinner-sized portions.
- Entertaining: sushi balls travel well and can be dressed up for elegant platters.
- Customization: you can easily make vegetarian, vegan, gluten-free, or keto-friendly adaptations.
What you’ll need (ingredients & equipment)
Ingredients
The ingredient list below is sized for about 8–10 medium sushi balls (serving 3–4 as a main or 6–8 as appetizers). I’ll include scaling notes later.
For the sushi rice
- 2 cups short-grain sushi rice (uncooked)
- 2 1/4 cups water (for cooking — see rice cooker/ stovetop notes)
- 1/3 cup rice vinegar
- 3 tablespoons granulated sugar
- 1 1/2 teaspoons fine sea salt
Filling / toppings (choose a few combinations)
- Fresh sashimi-grade salmon or tuna, diced (8–10 oz total) — or cooked shrimp, crab, or smoked salmon
- 1 ripe avocado, diced
- 1 small cucumber, deseeded and finely diced
- 2–3 green onions, thinly sliced
- Pickled ginger, thinly shredded (for garnish)
- Sesame seeds (white/black)
- Tobiko (flying fish roe) or masago (smelt roe) — optional
- Nori sheets, cut into thin strips or torn pieces
- Spicy mayo (store-bought or mix mayo + sriracha to taste)
- Unagi sauce (eel sauce) or a simple soy glaze
Optional flavor boosters
- Furikake (Japanese rice seasoning)
- Wasabi paste (for mixing into fish or for serving)
- Shredded daikon or carrots for volume and color
Equipment
- Rice cooker (recommended) or a heavy-bottomed saucepan with tight-fitting lid
- Wooden or plastic rice paddle (shamoji) or spatula
- Large shallow bowl or hangiri (wooden rice tub) if available — otherwise a wide bowl
- Sushi ball mold (temari mold) — optional but helpful. A 2.5–3 inch round cookie cutter, ramekin, or even a small bowl lined with plastic wrap also works.
- Plastic wrap (for hand shaping or lining molds)
- Sharp knife for cutting fish and vegetables
- Serving platter, chopsticks, small bowls for soy/wasaibi/mayo
The technique — rice is everything
Sushi rice is the heart of the Easy Sushi Balls Recipe. Get the rice right and everything else falls into place.
Step 1 — Rinse the rice
Place the rice in a bowl and cover with cold water. Swirl gently with your hand, then drain. Repeat 4–5 times until water runs clear. This removes excess surface starch and prevents gummy rice.
Step 2 — Soak
After rinsing, let the rice sit in fresh water for 20–30 minutes (this hydrates grains evenly). Drain thoroughly.
Step 3 — Cook
If you have a rice cooker, add the rice and 2 1/4 cups water and cook according to the cooker. For stovetop: bring the rice and water to a boil in a heavy saucepan, cover, reduce to the lowest heat and simmer 12–14 minutes. Remove from heat and let steam, covered, for 10 minutes.
Step 4 — Season the rice
While the rice cooks, warm the rice vinegar, sugar, and salt together in a small saucepan until sugar dissolves (no need to boil). Transfer cooked rice to a wide shallow bowl. Pour the vinegar mixture evenly over the rice and fold gently with a paddle or spatula—use cutting and turning motions, don’t smash. Fan the rice while folding (or simply keep a steady breeze going) to cool it quickly to room temperature and give the glossy finish sushi rice has. The rice should be slightly sticky but each grain defined.
Basic Easy Sushi Balls Recipe — step-by-step
This is the core recipe: seasoned rice with a savory center and bright toppings.
Preparing the fillings
- Fish: If you’re using sashimi-grade fish, slice into small cubes (1/4–1/2 inch). Keep chilled until assembly. If you prefer cooked options, lightly sear tuna or salmon (30 seconds per side), poach shrimp, or flake cooked crab.
- Vegetables: Dice the avocado and cucumber into small pieces. Toss avocado lightly with a squeeze of lemon to slow browning if not serving immediately.
- Sauces: Mix mayonnaise with sriracha for spicy mayo (start with 1 tablespoon sriracha to 1/3 cup mayo and adjust). Warm unagi sauce or make a soy-sesame glaze.
Assembling sushi balls (mold method)
- Cut a square of plastic wrap for each mold (about 8–10 inches). Spray or lightly oil the inside of the mold if sticking is a concern.
- Place a small amount (1–2 teaspoons) of sauce in the bottom of the mold if you want a saucy center. Add a spoonful of filling (e.g., diced fish + avocado).
- Add a portion of sushi rice (about 1/3–1/2 cup depending on mold size) over the filling. Press gently with the handle of a wooden spoon or with the plastic wrap to compact into a ball. Remove from mold, unwrap, and place on serving platter.
- Garnish with sesame seeds, a dab of spicy mayo, a strip of nori, or a sprinkle of tobiko.
Assembling by hand (no mold)
- Wet your hands lightly (moist, not dripping). Place a piece of plastic wrap on your palm.
- Put a small spoonful of filling in the center, top with rice.
- Gather the plastic and shape into a ball by pressing gently and rotating. Unwrap and finish with toppings.
Flavour combinations to try (recipes within the recipe)
Here are combinations that work beautifully with the Easy Sushi Balls Recipe. Mix and match.
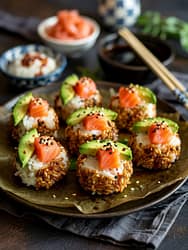
Classic Salmon & Avocado
- Filling: Diced sashimi-grade salmon + avocado
- Topping: Black sesame, thin lemon zest, micro greens
- Sauce: Light brush of soy + a dot of wasabi mayo
Spicy Tuna Crunch
- Filling: Diced tuna + chili oil + green onion
- Topping: Crispy tempura flakes or toasted panko
- Sauce: Spicy mayo and unagi drizzle
California-style (Cooked)
- Filling: Imitation crab or real crab + mayo + cucumber
- Topping: Masago and thin nori strips
- Great for: Picky eaters and parties
Vegan Rainbow
- Filling: Marinated beets, carrot ribbons, cucumber, and avocado
- Topping: Furikake (ensure vegan), toasted sesame
- Sauce: Ponzu or soy with a touch of maple for sweetness
Baked Salmon Oyako
- Filling: Oven-baked flaked salmon mixed with teriyaki mayo
- Topping: Thinly sliced scallion and sesame
- Note: This is a warm sushi ball variation for colder months.
Tips for perfection — chef secrets
- Rice texture: If your rice is too wet, reduce the water next time by 1–2 tablespoons. If too firm, add a sprinkle more water during cooking.
- Shaping: Don’t over-compact. Sushi rice should hold shape but remain airy. Over-pressing makes dense, heavy balls.
- Temperature: Serve sushi balls at room temperature. Fish should be cool but not fridge-cold. Very cold rice feels hard; warm rice will be soggy.
- Safety with raw fish: Only use sashimi-grade fish from trusted sources. Keep fish cold and consume the same day. Pregnant people and immunocompromised should avoid raw seafood.
- Knife technique: Use a very sharp knife and wipe it clean between cuts when working with delicate toppings to get neat pieces.
- Make-ahead: You can prepare fillings and sushi rice up to 4–6 hours ahead (keep rice covered to avoid drying). Assemble just before serving for best texture.
- Scale up for parties: For a party of 12, multiply rice by 3–4x and set up an assembly station so guests can customize their own—fun and interactive!
Presentation & serving suggestions
Sushi balls are inherently pretty—amplify that with a few presentation tips.
- Use a long wooden board or slate and arrange sushi balls in neat rows. Accent with edible flowers, pickled ginger piles, and small bowls of soy sauce, spicy mayo, and pickled vegetables.
- Serve with a small spoon or tweezer for guests to add finishing sauces or toppings.
- For an elegant dinner, place one medium sushi ball on a small individual plate with a smear of sauce and a microgreen on top.
- Add height and texture: scatter crispy shallots or tempura crumbs around the platter.
- If serving outdoors or at a buffet, cover plated balls lightly with plastic wrap and keep chilled until 10 minutes before serving.
Variations & dietary swaps
The beauty of the Easy Sushi Balls Recipe is how adaptable it is.
Vegetarian: Replace fish with marinated tofu, grilled shiitake, or roasted sweet potato. Use soy sauce, sesame oil, and mirin for flavour depth.
Vegan: Use mango, avocado, pickled radish, and marinated tempeh. Opt for vegan mayo for creamy sauces.
Gluten-free: Use tamari instead of soy sauce; check other sauces for hidden gluten.
Low-carb: Substitute cauliflower rice (lightly seasoned with rice vinegar) for a low-carb version—note texture will differ.
Keto: Use mashed cauliflower with a small binder of xanthan gum and sesame oil; focus on fatty fish and avocado toppings.
Troubleshooting common problems
- Rice is mushy: You added too much water or overcooked. Next batch: reduce water slightly and check cooker settings.
- Rice doesn’t stick: This might be long-grain rice; always use short-grain sushi rice. Ensure rice is seasoned and slightly warm when shaping.
- Balls fall apart: You didn’t press enough. Lightly press inside the mold or use slightly more rice. Avoid overfilling with watery fillings.
- Avocado browning: Toss avocado with a little lemon or lime juice just before assembling.
- Fish tastes “fishy”: Use the freshest sashimi-grade fish and keep it cold. If unsure, cook the fish lightly.
Storage & leftovers
- Assembled sushi balls: Best eaten immediately. If you must store, keep in an airtight container in the refrigerator for up to 24 hours. Texture will degrade—rice firms and toppings may weep.
- Rice: Store separately in the refrigerator for up to 2 days. Refresh at room temperature and gently loosen before forming new balls.
- Fish/ fillings: Keep cold and use within 24 hours. Cooked fillings (poached shrimp, cooked crab) can last 2–3 days refrigerated.
Serving pairings & beverage suggestions
- Classic: Light, chilled sake (Junmai Ginjo) or an easy-drinking cold lager.
- Non-alcoholic: Iced green tea or yuzu soda.
- Wine: A crisp, high-acid white like Alberio or a lightly oaked Riesling pairs nicely.
- Cocktails: A grapefruit highball or gin with cucumber tonic complements the clean flavours.
Frequently asked questions (short & practical)
Q: Can I use brown rice?
A: You can, but the texture and flavour will change. Brown rice is nuttier and less sticky—add a little extra vinegar and press firmly when shaping.
Q: Do I need a mold?
A: No. Molds make uniform shapes easier, but hands + plastic wrap work perfectly.
Q: Is sushi rice the same as regular rice?
A: Sushi rice is short-grain rice that becomes sticky when cooked. It’s seasoned with rice vinegar, sugar, and salt to create the signature sushi flavour.
Q: Can I freeze sushi balls?
A: I don’t recommend freezing sushi balls with raw fish or avocado. Cooked-filling balls can sometimes be frozen, but texture will suffer.
Make-ahead party strategy
- Morning: Rinse and cook rice, season and cool. Prepare sauces and fillings that hold (cooked shrimp, crab, pickled veggies).
- Afternoon: Dice vegetables and fish (keep fish chilled). Arrange toppings and garnishes in bowls.
- 30 minutes before: Assemble sushi balls on a chilled platter or let guests assemble at a station. Finish with garnishes to keep appearance fresh.
Final notes from the chef
This Easy Sushi Balls Recipe is about joyful cooking—beautiful food that’s fun to make and even better to share. Whether you stick with classic salmon and avocado, experiment with bold fusion flavours, or build a vegan rainbow platter, sushi balls give you the flexibility to be creative without the pressure. Pay special attention to your rice (it’s more important than you think), choose fresh ingredients, and don’t be afraid to mix textures—creamy avocado, crunchy tempura, and silky fish make a memorable bite.
Easy Sushi Balls Recipe
Ingredients
For Sushi Rice
- 2 cups short-grain sushi rice uncooked
- 2 ¼ cups water
- ⅓ cup rice vinegar
- 3 tablespoons sugar
- 1 ½ teaspoons salt
For Fillings (mix & match)
- 8 –10 oz sashimi-grade salmon or tuna or cooked shrimp/crab
- 1 ripe avocado diced
- 1 small cucumber finely diced
- 2 green onions sliced
Toppings & Garnish
- Sesame seeds white or black
- Nori sheets cut into strips
- Tobiko or masago optional
- Pickled ginger
- Spicy mayo
- Soy sauce or unagi sauce
Instructions
Rinse the Rice:
- Rinse sushi rice under cold water 4–5 times until the water runs clear. Drain well.
Cook the Rice:
- Cook rice with water in a rice cooker or on the stovetop. Let it steam for 10 minutes after cooking.
Season the Rice:
- Warm rice vinegar, sugar, and salt until dissolved. Transfer rice to a wide bowl, pour seasoning over it, and gently fold while cooling to room temperature.
Prepare Fillings:
- Dice fish, avocado, cucumber, and green onions. Keep fish chilled until assembly.
Shape the Sushi Balls:
- Line a small bowl or mold with plastic wrap. Add fillings first, then top with sushi rice. Press gently and invert to release.
Add Toppings:
- Garnish with sesame seeds, nori strips, spicy mayo, or tobiko.
Serve:
- Serve immediately with soy sauce, wasabi, and pickled ginger.
Notes
- Tips: Slightly wet hands to prevent rice from sticking. Do not over-compact the rice.
- Storage: Best eaten fresh. Can be refrigerated up to 24 hours in an airtight container.
- Variations:
- Vegan: Use avocado, cucumber, carrots, and tofu
- Spicy: Add sriracha or chili oil to fillings
- Cooked option: Use baked salmon or imitation crab