Dark Chocolate Granola Recipe
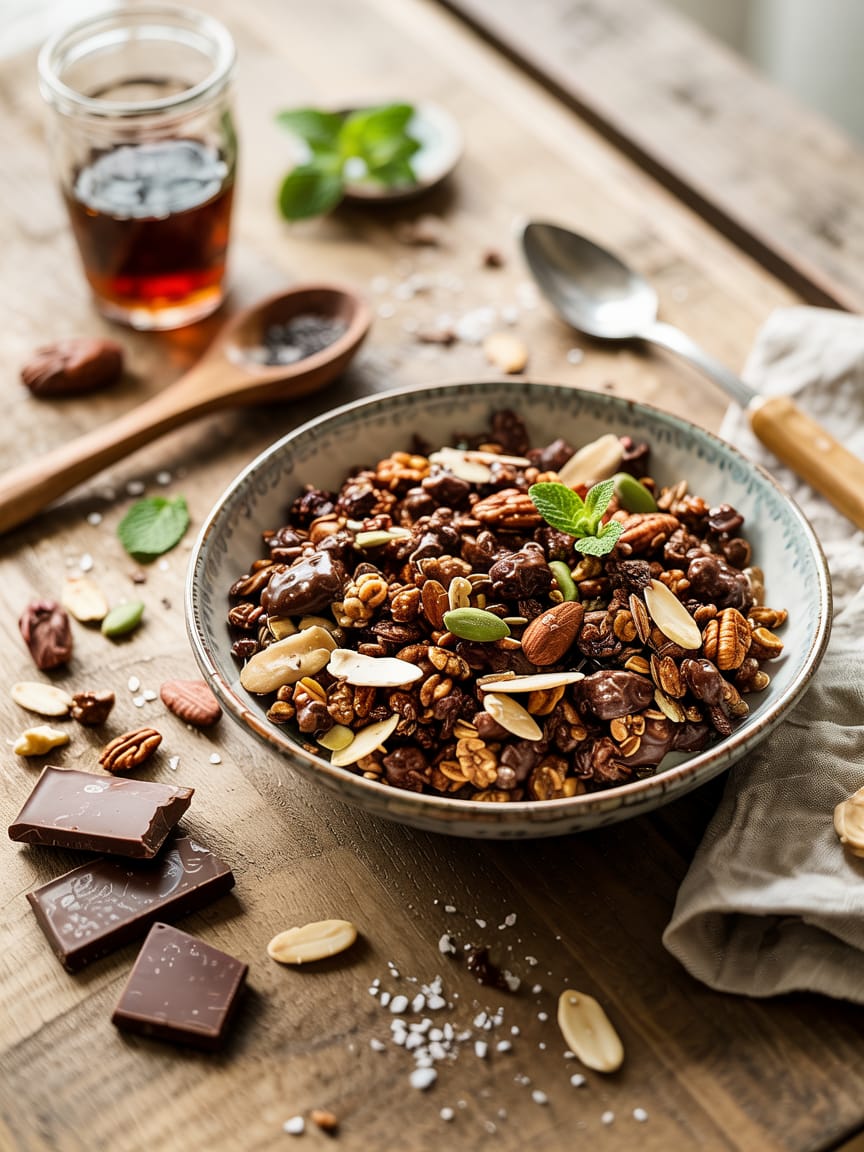
There’s something deeply comforting about the sound of oats sizzling in a warm pan and the faint, irresistible scent of cocoa and brown sugar drifting through the kitchen. This Dark Chocolate Granola Recipe takes that cozy feeling and elevates it — rich dark chocolate, crunchy clusters, toasty nuts, and a whisper of sea salt for contrast. It’s perfect for breakfast, an afternoon snack, or a crunchy topping for yogurt, smoothie bowls, and ice cream. In this post I’ll walk you through every detail: ingredients, technique, oven vs. stovetop methods, variations (gluten-free, vegan, no-bake), troubleshooting, storage, and creative serving ideas. Consider this your go-to guide for making show-stopping dark chocolate granola at home.
Why make this Dark Chocolate Granola Recipe?
Making granola at home gives you control: flavor, sweetness, texture, and the quality of fats and inclusions. Store-bought granolas can be overly sweet, packed with oils you don’t want, or lacking in real chocolate. This recipe balances deep cocoa flavor with real dark chocolate, keeps sweetness in check, and encourages chunkier clusters that hold up in milk or on top of creamy bowls. You’ll find it:
- Customizable — swap nuts, seeds, and sweeteners freely.
- Better for portion control — make single or double batches.
- Fresher and more flavorful than most store-bought options.
- Perfect for gifts — packaged in jars it’s a beautiful homemade present.
Now let’s get into the nitty-gritty.
Ingredients (makes about 8–10 cups)
These quantities are flexible; the recipe is forgiving. If you want a smaller batch, halve everything.
Dry base
- 4 cups old-fashioned rolled oats (not quick oats)
- 1 cup chopped nuts (combination of almonds, pecans, walnuts — toasted)
- 1/2 cup toasted coconut flakes (optional — unsweetened)
- 1/2 cup raw sunflower seeds or pumpkin seeds (pepitas)
Chocolate & flavor
- 1/2 cup high-quality dark cocoa powder (unsweetened) — Dutch-processed if you like a smoother, deeper chocolate
- 6–8 ounces dark chocolate, chopped (60–75% cacao recommended) — see notes below
Sweetener & binder
- 1/2 cup pure maple syrup or honey (use maple to keep it vegan)
- 1/3 cup neutral oil (refined coconut oil, avocado oil, or light olive oil)
- 2 tablespoons unsweetened applesauce (optional — helps bind without adding more oil)
- 1 teaspoon pure vanilla extract
Seasoning
- 1/2 teaspoon fine sea salt (plus flaky sea salt for finishing)
- 1/2 teaspoon ground cinnamon (optional — warms the flavor)
Optional mix-ins (add after baking)
- 1/2 cup dried cherries, cranberries, or goji berries
- 1/2 cup roasted cacao nibs (for extra crunch and bitterness)
- 1/4–1/2 cup milk or white chocolate chips (if you want pockets of sweet contrast)
Notes on chocolate: Choose a bar-style dark chocolate you enjoy eating on its own. The flavor concentration matters — lower cocoa % will be sweeter; higher percentage will be more bitter. You will both stir cocoa powder into the dry mix and toss in chopped dark chocolate so you get both even chocolate flavor and melty chunks.
Equipment
You don’t need fancy gear. These are recommended:
- Large mixing bowl
- Whisk and rubber spatula
- Baking sheet(s) (rimmed) — two if you’re making a large batch
- Parchment paper or silicone baking mat
- Thin-bladed knife and cutting board (for chocolate)
- Instant-read thermometer (optional, useful if you decide to toast nuts precisely)
Technique overview — what makes great granola?
Three things determine excellent granola: even coating, low-and-slow baking to develop color without burning, and careful stirring to create clusters while still allowing some loose crumbs.
- Even coating: The liquid mixture (oil + sweetener) must be warm and thin enough to coat oats and nuts evenly. Cocoa powder must be sifted or whisked with dry ingredients to prevent clumps.
- Low-and-slow bake: Bake at 300–325°F (150–160°C). Higher heat risks burning the sugars before the oats are toasted.
- Clusters: Stir less often for bigger clusters. Stir more for looser granola. Pressing the granola into the pan before baking helps form clusters.
Step-by-step method (oven-baked)
This is my preferred method for best texture and flavor.
- Preheat and prep
Preheat the oven to 300°F (150°C). Line a rimmed baking sheet with parchment or a silicone mat. Measure ingredients. - Toast nuts & seeds (optional but recommended)
Spread nuts and seeds on a baking sheet and toast for 8–10 minutes until fragrant and lightly browned. Watch carefully — nuts go from perfect to bitter fast. Remove and cool slightly. - Combine dry ingredients
In a large bowl, whisk together the rolled oats, cocoa powder, cinnamon, and salt until the cocoa is evenly distributed and there are no lumps. Add the toasted nuts, coconut flakes, and seeds; toss to combine. - Make the wet mixture
In a small saucepan over low heat, warm the oil, maple syrup (or honey), and applesauce until fluid and combined — don’t boil. Remove from heat and whisk in vanilla. Why warm? Warm liquid coats the dry ingredients more evenly; cold maple syrup can resist combining. - Combine and mix
Pour the warm liquid over the oat mixture. Use a spatula to fold gently until everything is coated. If you want chunky clusters, fold minimally. - Press and bake
Transfer the mixture to your prepared baking sheet and spread into an even layer. For larger clusters, press the granola firmly into the sheet with the back of a spatula. Bake for 20–30 minutes, rotating the pan halfway. The granola should be dry to the touch but still slightly soft; it will crisp as it cools. - Add chopped chocolate
Remove the pan from the oven and while still warm, scatter chopped dark chocolate over the granola. If you want partially melted pockets of chocolate, let the warmth do its work for 1–2 minutes, then gently fold a few times so some chocolate melts and some remain as chunks. Alternatively, you can wait until cool to add chocolate to maintain perfectly distinct chocolate chunks. - Cool completely
Allow the granola to cool fully on the baking sheet — at least 1 hour. Break into clusters with your hands or a spatula. Sprinkle flaky sea salt if desired. - Store
Transfer to an airtight container. Granola stays crisp at room temperature for up to 2 weeks; in a refrigerator it keeps 3–4 weeks. For longer storage, freeze in a sealed freezer bag up to 3 months.
Quick stovetop method (no oven)
If you don’t want to bake, you can make granola on the stovetop with more of a toasted, brittle texture.
- Use a large, heavy-bottomed skillet over medium-low heat. Toast oats, nuts, and seeds dry until fragrant (stir constantly).
- Reduce heat to low. Add oil and sweetener; stir continuously until the mixture binds and darkens slightly (5–8 minutes).
- Remove from heat and stir in cocoa powder and chocolate pieces. Spread onto a sheet to cool and harden. This produces a denser, chewier granola.
Note: Stovetop granola lacks the same even toasting as oven-baked, but it’s faster and excellent when you want a chewy, bar-like texture.
Tips and troubleshooting
- Clumpy vs. loose granola: For big clusters, press the mixture into the baking sheet and avoid stirring more than once or twice while baking. For crumbly granola, stir every 8–10 minutes to break clusters.
- Too soft after bake: If granola is still soft after full bake and cooling, return to the oven for 5–8 minutes. Overly soft granola usually means it needed more baking time or the wet ratio was too high.
- Burnt granola: Dark granola can look deceptively browned because of the cocoa. Taste before discarding. If it tastes bitter/ashy, it’s burnt; otherwise it may just be well-toasted.
- Chocolate melted away: If you prefer distinct chocolate chunks, wait until granola is completely cool before adding chocolate. If you want some pockets of melted chocolate, add while the granola is warm but not hot.
- Sweetness level: Adjust maple syrup/honey by a couple of tablespoons to suit your taste. Dark chocolate balances sweetness, so err on the conservative side and add more later if needed.
Variations and dietary swaps
This recipe is highly adaptable. Below are popular variations and ingredient substitutes.
Vegan
- Use maple syrup instead of honey. Use coconut oil or avocado oil as the fat. Skip milk/white chocolate chips or choose dairy-free chocolate chips.
Gluten-free
- Use certified gluten-free rolled oats. All other ingredients are naturally gluten-free; watch cross-contamination in packaged mix-ins.
Lower sugar
- Reduce maple syrup to 1/3 cup and increase applesauce or add 2 tablespoons of nut butter (acts as binder). Add unsweetened cacao nibs to keep intense chocolate flavor without sugar.
Keto / low-carb
- Replace oats with a mix of crushed nuts, shredded coconut, and seeds. Use sugar-free syrup sparingly and add unsweetened dark chocolate (very high cacao%) or cacao nibs.
Nut-free
- Replace nuts with extra seeds: pumpkin seeds (pepitas), sunflower seeds, and hemp seeds. Add more coconut for body if desired.
Spiced & boozy
- Add espresso powder (1 teaspoon) to intensify chocolate flavor. For an adult twist, toss finished granola with 1 tablespoon of bourbon or rum (works best if you briefly warm it to let alcohol evaporate slightly).
Breakfast bar version
- Press the mixture into a lined square pan, bake, then cut into bars once fully cooled. For firmer bars, press mixture tightly and bake 10–15 minutes longer.
Add-ins to experiment with
- Orange zest (brightens dark chocolate)
- Toasted hazelnuts (classic pairing with dark chocolate)
- Crystallized ginger (for a spicy-sweet kick)
- Macadamia nuts or pecans for richness
Serving suggestions — beyond cereal
This Dark Chocolate Granola Recipe is versatile. Here are creative ways to use it:
Breakfast
- Classic: Pour milk over granola and enjoy. Use whole milk, oat milk, or a milk alternative.
- Yogurt bowl: Spoon Greek yogurt into a bowl, add a handful of granola, fresh berries, and a drizzle of honey or maple syrup.
- Smoothie bowl topper: Sprinkle on top of a thick smoothie bowl for texture and chocolate hits.
Dessert
- Ice cream crunch: Scatter over vanilla or coffee ice cream. The contrast of cold cream and crunchy chocolate granola is phenomenal.
- Parfait layers: Layer granola with whipped mascarpone and berry compote for an elegant dessert.
Baking & cooking
- Cheesecake crust: Pulse granola in a food processor (leave some larger bits) and mix with melted butter to press into a tart or cheesecake crust.
- Cookie or brownie mix-in: Fold coarse chunks into cookie dough or brownie batter for extra crunch.
Snacking
- Trail mix: Combine with dried fruit and extra cacao nibs for portable snacks.
- Yogurt cups for lunchboxes: Layer granola with yogurt in small jars for portable breakfasts.
Garnish or gift
- Gift jars: Pack in jars, tie with ribbon, and add a handwritten label. Great for holidays or hostess gifts.
- Topping for roasted pears or apples: Sprinkle granola on warm fruit with a scoop of vanilla ice cream.
Nutrition and calorie notes (approximate)
Granola is energy-dense because of the nuts and oil. Here’s a rough guideline per 1/2-cup serving (this varies widely depending on nuts, oil, and chocolate used):
- Calories: 260–340 kcal
- Fat: 14–20 g (with healthy mono- and polyunsaturated fats)
- Carbohydrates: 28–36 g (including natural sugars in maple/honey and any added dried fruit)
- Fiber: 4–6 g
- Protein: 5–7 g
If you need precise nutrition for diets or labels, use a nutrition calculator with your exact ingredient brands and quantities.
Batch scaling and timing
- Double the recipe: Use two baking sheets and rotate them mid-bake for even toasting. Don’t crowd the pan; air circulation matters.
- Single-serve mini batch: Halve everything and use a small sheet or skillet. Adjust bake time slightly — smaller volumes sometimes need less time.
- Make-ahead: Granola makes a beautiful make-ahead breakfast. It actually benefits from resting — flavors meld and clusters stabilize.
Best ingredient picks (chef’s notes)
- Oats: Old-fashioned rolled oats give the best texture. Steel-cut oats won’t crisp the same way and quick oats can become powdery.
- Chocolate: Use a chocolate bar you love. Chocolate chips often contain stabilizers that prevent true melting. Chopping a bar yields better texture and melt.
- Oil: Refined coconut oil is neutral and gives great mouthfeel; avocado oil is a healthy neutral alternative. Extra-virgin olive oil can work for a savory-sweet spin but use a mild one.
- Sweetener: Pure maple syrup adds a subtle woodsy note that pairs beautifully with dark chocolate; honey is more floral. Brown rice syrup is another option but is less sweet.
- Sea salt: Flaky sea salt at the end transforms the flavor — don’t skip it.
Storage, shelf life, and gifting
- Room temp: Airtight jar or container — up to 2 weeks. Keep away from humidity.
- Refrigerator: Up to 4 weeks — helps if you’ve added fruit or if your kitchen is warm.
- Freezer: Up to 3 months in freezer bags — thaw at room temp and lightly re-crisp in a 300°F oven for 5–8 minutes if needed.
For gifting: fill sterilized jars, consider layering granola for visual appeal, and attach a card with serving suggestions and a “best by” date (2–3 weeks at room temp).
Final thoughts & serving inspiration
This Dark Chocolate Granola Recipe is one of those pantry-kitchen miracles: humble ingredients transformed into something addictive and versatile. It’s indulgent without being cloying, and the bitter-sweet interplay between dark chocolate and toasted oats is a crowd-pleaser. Whether you’re spooning it over yogurt for breakfast, using it as a crunchy dessert element, or packing it into jars for friends, this granola is a dependable, delicious recipe to keep in your repertoire.

Dark Chocolate Granola Recipe
Ingredients
- 4 cups old-fashioned rolled oats
- 1 cup chopped nuts almonds, pecans, or walnuts, toasted
- 1/2 cup unsweetened coconut flakes optional, toasted
- 1/2 cup pumpkin seeds or sunflower seeds toasted
- 1/2 cup unsweetened dark cocoa powder sifted or well-whisked
- 1/2 cup pure maple syrup or honey for non-vegan
- 1/3 cup neutral oil refined coconut oil, avocado oil, or light olive oil
- 2 tbsp unsweetened applesauce optional — helps bind
- 1 tsp pure vanilla extract
- 1/2 tsp fine sea salt plus flaky sea salt for finishing
- 1/2 tsp ground cinnamon optional
- 6 –8 oz dark chocolate bar coarsely chopped (60–75% cacao recommended)
- Optional add-ins fold in after baking:
- 1/2 cup dried cherries or cranberries
- 1/2 cup cacao nibs or chocolate chips dairy-free if vegan
- Zest of 1 orange optional, for chocolate-orange variation
Instructions
- Preheat the oven to 300°F (150°C). Line a rimmed baking sheet with parchment paper or a silicone mat.
- (Optional) Toast the nuts and seeds: spread the chopped nuts and seeds on a baking sheet and toast 8–10 minutes until aromatic and lightly golden. Remove and let cool.
- In a large bowl, whisk together the rolled oats, cocoa powder, cinnamon (if using) and fine sea salt until evenly combined (break up any cocoa lumps). Add the toasted nuts, coconut flakes and seeds; toss to combine.
- In a small saucepan over low heat, warm the oil, maple syrup (or honey) and applesauce just until fluid and combined — do not boil. Remove from heat and stir in vanilla extract.
- Pour the warm liquid over the dry ingredients. Fold gently with a spatula until everything is evenly coated. For chunkier clusters, stir as little as possible.
- Transfer the coated mixture to the prepared baking sheet. Spread into an even layer and press firmly with the back of a spatula (pressing creates larger clusters).
- Bake 20–30 minutes, rotating the pan halfway through for even toasting. Watch carefully so the cocoa doesn’t darken too quickly — you want fragrant, toasted oats, not burned ones.
- Remove the pan from the oven and immediately scatter the chopped dark chocolate over the warm granola. Let sit 1–2 minutes so a portion softens; gently fold a few times if you want some pockets of melted chocolate. For distinct chunks, wait until granola is completely cool before adding chocolate.
- Cool the granola completely on the baking sheet (about 1 hour). Break into clusters by hand or with a spatula. Finish with a few flakes of sea salt, if desired.
- Store cooled granola in an airtight container at room temperature (see Notes) or freeze for longer storage.
Notes
- Clusters vs. crumb: Press mixture into the pan before baking and avoid stirring frequently during bake for large clusters. Stir more during baking for looser granola.
- Chocolate handling: Add chopped chocolate while granola is warm for partially melted pockets; add when cool for intact chunks.
- Sweetness: Start with 1/2 cup maple syrup and adjust next time if you want it sweeter or less sweet. Dark chocolate offsets sweetness — taste and tweak.
- Oats: Use old-fashioned rolled oats for best texture. Quick oats will become powdery; steel-cut oats won’t crisp properly.
- Nut-free: Replace nuts with extra seeds (pumpkin, sunflower, hemp).
- Vegan: Use maple syrup and dairy-free chocolate.
- Storage: Airtight container at room temperature for up to 2 weeks (keep away from humidity). Refrigerate up to 4 weeks or freeze up to 3 months. Re-crisp frozen/thawed granola in a 300°F oven for 5–8 minutes if needed.
- Make-ahead gift tip: Fill sterilized jars, add a ribbon and a small label with serving suggestions and a “Best by” date (2–3 weeks at room temp).
- Nutrition note: Granola is calorie-dense—watch portion size. See Recipe Card Info for an estimate.