Chicken Onigiri Recipe
If you love hands-on comfort food that’s portable, versatile, and packed with flavor, you’ll adore this Chicken Onigiri Recipe. As a professional chef who’s made thousands of onigiri for busy cooks, picnic lovers, and late-night snackers, I’ll walk you through every detail: from choosing the right rice to preparing the perfect chicken filling, shaping and seasoning, storage and reheating, and dozens of tasty variations. Expect practical technique, chef-level tips, and serving ideas that will turn a humble rice ball into a star of any meal.
Why this Chicken Onigiri Recipe works
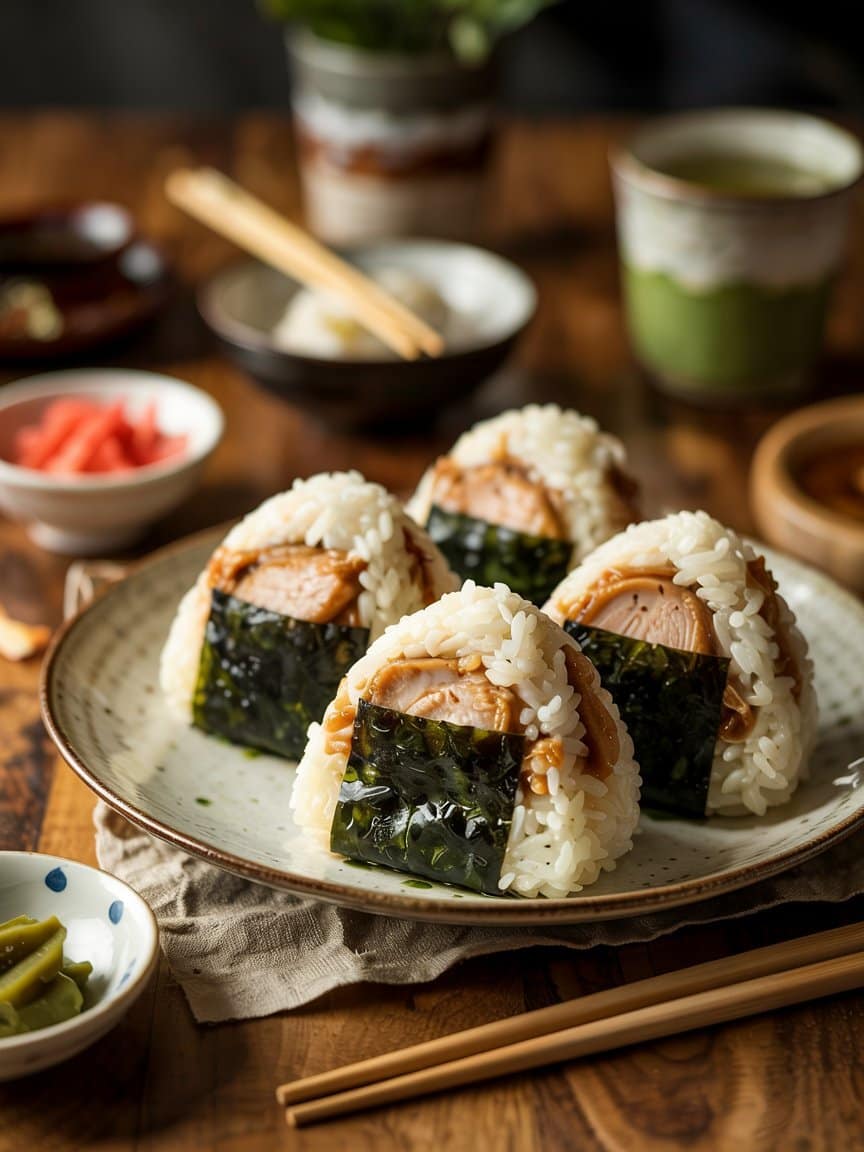
Onigiri (おにぎり) are Japanese rice balls traditionally formed into triangles, rounds, or cylinders and often filled with savory centers. The beauty of the Chicken Onigiri Recipe is its balance: tender, well-seasoned chicken wrapped in sticky, slightly seasoned rice and usually finished with nori (seaweed) or a sprinkling of sesame seeds. It’s comforting, portable, and endlessly adaptable — perfect for lunches, bento boxes, road trips, or a quick dinner with miso soup.
In this post I’ll cover:
- Ingredients (with metric and US-friendly measures)
- Step-by-step preparation for rice, chicken filling, and assembly
- Tips on shaping, wrapping, and presenting
- Variations (teriyaki chicken, spicy kimchi, curry, vegetarian swaps)
- Troubleshooting common problems
- Storage, reheating, and serving suggestions
Read on — and by the end you’ll have professional-level Chicken Onigiri Recipe skills to impress friends and keep your kitchen organised.
Ingredients
Below are ingredients for about 8 medium-sized rice balls (onigiri). Adjust quantities up or down depending on how many you need.
For the rice
- 3 cups (540 g) Japanese short-grain rice (sushi rice) — rinsed until water runs clear.
- 3 1/4 cups (780 ml) water for cooking (adjust depending on your rice cooker/brand).
- 1/2 teaspoon salt (optional, to season rice).
For the chicken filling (classic teriyaki-style)
- 300–350 g boneless skinless chicken thighs or breasts (about 10–12 oz). Thighs give more flavor and keep moist.
- 2 tablespoons soy sauce (30 ml).
- 1 1/2 tablespoons mirin (sweet rice wine) or substitute 1 1/2 teaspoons sugar + 1 tablespoon water.
- 1 tablespoon sake (optional) or dry white wine.
- 1 tablespoon honey or sugar (12–15 g).
- 1 tablespoon toasted sesame oil (15 ml).
- 1 teaspoon grated ginger.
- 1 teaspoon minced garlic (optional).
- Pinch of black pepper.
- 1 teaspoon toasted sesame seeds (for finishing, optional).
Assembly & finishing
- Nori sheets, cut into strips or quartered (as needed).
- Plastic wrap (for shaping) or a wet wooden onigiri mold.
- Sesame seeds or furikake (Japanese rice seasoning) for rolling or sprinkling.
- Optional: a small bowl of lightly salted water (to wet your hands and prevent rice sticking).
Equipment you’ll want
You don’t need fancy tools, but these make life easier:
- Rice cooker (best) or heavy-bottom pot with lid.
- Non-stick skillet or small saucepan for the chicken filling.
- Sharp knife and cutting board.
- Bowl of cold water for rinsing hands.
- Plastic wrap (cling film) for shaping when you don’t want to get sticky.
- Onigiri mold (optional) for uniform shapes.
- Small spatula or spoon for filling.
Step-by-step: make the perfect rice
The rice is the foundation of any Chicken Onigiri Recipe. Use Japanese short-grain rice — it holds together and has the right chewiness.
- Measure and rinse the rice. Put 3 cups rice in a bowl, cover with cold water, swirl by hand, drain. Repeat rinsing until the water is almost clear (usually 3–5 rinses). This removes excess starch and prevents the rice from becoming gluey on the surface while still being sticky enough to form.
- Soak the rice. After the final rinse, cover with fresh water and let it soak for 20–30 minutes at room temperature. Soaking helps the grains hydrate evenly and cook properly.
- Cook the rice. Drain the soaked rice and put it in your rice cooker with 3 1/4 cups water (adjust to manufacturer instructions — some post-soak rices require slightly less). If using a stovetop pot: bring to a boil, then turn to low, cover and cook 12–15 minutes. Let the rice rest 10 minutes after cooking with the lid on for the final steam — this is crucial.
- Season (optional). For traditional onigiri you don’t add vinegar (that’s for sushi), but a light sprinkle of salt on the rice or a small amount mixed in can help flavor. I recommend keeping the rice plain or lightly salted so the chicken filling shines.
- Cool slightly. Spread rice in a large bowl or keep it in the cooker with the lid slightly ajar to let steam escape. Rice should be warm, not piping hot, when shaping (warm rice clings nicely and is comfortable to handle).
Step-by-step: prepare the chicken filling
This teriyaki-style chicken filling is savory, slightly sweet, and holds together well inside rice. It’s forgiving and can be made a day ahead.
- Cut the chicken. Dice chicken into 1/2–3/4 inch pieces if you prefer chunky bites; or mince/chop finely for a smoother filling.
- Sear for flavor (optional). Heat a non-stick skillet over medium-high heat. Add sesame oil, then the chicken. Sear until golden — don’t fully cook through; you’ll finish it in the sauce. Searing adds caramelized flavor.
- Add aromatics. Add grated ginger and minced garlic, cook 30–45 seconds until fragrant.
- Make the sauce. Add soy sauce, mirin, sake (if using), and honey/sugar. Stir to combine.
- Simmer. Reduce heat to medium-low and simmer until the sauce thickens and glazes the chicken, about 5–8 minutes. If the sauce is thin, remove the chicken and continue to reduce the sauce until syrupy, then toss the chicken back. Taste and adjust: add a touch more honey for sweetness or a splash more soy for saltiness.
- Finish. Sprinkle toasted sesame seeds and a small drizzle of sesame oil if you want a fragrant finish. Cool the filling to warm or room temperature before filling onigiri. Hot filling can make the rice soggy and is harder to shape.
Chef’s tip: For a shred-style onigiri (like shredded chicken), cook the thighs whole in the sauce for longer, shred with two forks, then reduce the sauce and toss the shreds until nicely glazed. This creates a soft, moist filling that packs easily.
Shaping onigiri — hands-on method (triangle & round)
Shaping is where presentation meets technique. Two common methods: using wet hands or plastic wrap / mold.
Wet-hands (traditional)
- Prepare salted water. Keep a small bowl of water and a bit of salt by your work station. Wet hands, sprinkle a pinch of salt, and rub to coat. Salt seasons the outer rice and prevents sticking.
- Scoop rice. Take about 1/2 to 3/4 cup (120–180 g) of warm rice into your hand.
- Create a pocket. Press the rice gently into a flattened disc and make a small indentation in the center. Place 1–2 tablespoons of chicken filling inside.
- Enclose the filling. Fold rice over the filling and press gently to seal, shaping into a triangle by cupping your hand and pressing the sides. Use the base of your palm and fingertips to form a compact but not rock-hard shape. Avoid squeezing too tightly — you want a cohesive but tender texture.
- Finish edges. Run your thumb along the edges to sharpen the triangle if desired. Wrap a nori strip around the bottom or side to make a clean, non-sticky surface for gripping.
Plastic wrap method (clean & fast)
- Lay a square of plastic wrap on the counter. Put rice in the center, add filling, then gather the wrap and twist gently to form a tight ball or triangle. This is great for lunchboxes and for those who prefer not to touch rice.
- You can also shape with an onigiri mold: line the mold with plastic wrap or lightly oil, add rice and filling, then press and unmold.
Chef’s tip: Triangles are classic, but round and cylindrical shapes are fine — consistency matters more for presentation than shape variety.
Wrapping, finishing & garnishes
- Nori: Toasted nori strips wrapped around the onigiri keep hands clean and add umami. For best texture, wrap nori just before serving — otherwise it can get soggy. If storing, keep nori separate and wrap before eating.
- Sesame seeds & furikake: Roll the onigiri lightly in sesame seeds or sprinkle furikake on the rice before shaping for added flavor.
- Soy glaze: Brush a light glaze (reduced soy + mirin) on the outside and briefly torch or pan-sear for a crispy, caramelized skin — this is a great variation called yaki onigiri (grilled rice ball), though with a chicken filling it becomes more of a special treat.
- Pickled accent: A small wedge of pickled plum (umeboshi) or pickled ginger on the side pairs beautifully with the chicken onigiri.
Variations — make this Chicken Onigiri Recipe your own
The beauty of onigiri is adaptability. Below are ideas to inspire you.
1. Teriyaki shredded chicken onigiri
Slow-cook thighs, shred, reduce the teriyaki sauce to a sticky glaze, toss with the shreds. This gives a comforting texture that melds with rice.
2. Spicy chicken onigiri
Mix the chicken with a touch of gochujang or sriracha, and add finely chopped scallions. Garnish with chili sesame seeds.
3. Curry chicken onigiri
Combine finely diced chicken with a thick Japanese curry roux. The curry should be reduced until thick to avoid soggy rice. This makes a rich, savory interior.
4. Mayo-mixed chicken
Toss cooled, diced teriyaki chicken with Kewpie mayonnaise and a pinch of sugar. This creamy filling is popular in convenience store onigiri variations.
5. Lemon herb chicken
Use a simple lemon-soy marinade and integrate finely chopped parsley or shiso for a bright, fresh filling.
6. Smoky miso chicken
Marinate and glaze chicken with miso, honey, and a dash of smoked paprika for depth.
7. Vegetarian options
Swap chicken for marinated shiitake mushrooms or mashed edamame mixed with carrot and miso — still delicious and satisfying.
Serving suggestions & pairings
Chicken onigiri is flexible — serve it many ways:
- Bento box: Pair with tamagoyaki (Japanese rolled omelet), pickles, edamame, and fruit.
- Light meal: Serve with a bowl of miso soup, a small salad, and pickled cucumbers.
- Picnic: Wrap individually in plastic wrap and pack with chilled tea and fruit.
- Snack: Serve warm with a side of pickled ginger and a small dish of soy for dipping.
- Party platter: Arrange mini onigiri with corner nori wraps, a variety of fillings, and toothpicks for guests.
Beverage pairings: green tea, cold barley tea (mugicha), a light lager, or a crisp white wine for more formal occasions.
Make-ahead, storage & reheating
One of the best things about this Chicken Onigiri Recipe is make-ahead convenience.
- Short-term storage (same day): Wrap individually in plastic wrap and keep in the refrigerator for up to 6–8 hours. Let rice come to near room temperature before eating, or reheat briefly (see below).
- Longer storage: For best texture, avoid refrigerating rice for more than 24 hours. If you must, store unwrapped in an airtight container to reduce condensation, but know the rice will firm and dry — still edible, just different texture.
- Freezing: Freeze individual wrapped onigiri for up to 1 month. To reheat, unwrap and microwave from frozen for 60–90 seconds (times vary), or thaw in the fridge overnight and reheat. If you plan to freeze, keep nori separate and add fresh at serving.
- Reheating tips: Microwave on a microwave-safe plate, covered with a damp paper towel to restore moisture. For a crisp exterior, pan-sear in a hot, lightly oiled skillet for a minute per side after microwaving. Avoid overheating; you want warm rice, not rock-hard.
Troubleshooting common problems
Rice too sticky or gummy: You may have overcooked, used the wrong rice, or not rinsed enough. Use short-grain Japanese rice and rinse thoroughly.
Filling leaks or makes rice soggy: Fillings must be cooled and thick. Reduce sauces until syrupy and avoid watery fillings.
Onigiri fall apart: Use warm (not cold) rice and firm but gentle pressure when shaping. If rice is too dry, lightly wet your hands before shaping.
Nori becomes soggy: Wrap nori just before eating. To pack for later, store nori separately.
Rice hard after refrigeration: This is normal. Reheat gently with a damp towel in the microwave to restore softness.
Nutrition & portioning (rough guide)
A medium onigiri with chicken filling is generally about 200–300 kcal depending on rice amount and filling richness. Chicken thighs and teriyaki glaze add fat and sugar; for a lighter version, use chicken breast, reduce honey, and add lots of vegetables as filling. For exact nutrition, weigh your portions and use a nutrition calculator.
Final tips from a chef
- Use quality short-grain rice. It’s the foundation — don’t substitute long-grain rice if you want authentic texture.
- Mind the moisture. Cool fillings to room temperature; reduce sauces well.
- Keep salt handy. A light pinch on the outside of the rice makes a world of difference for flavor.
- Practice shaping. The first few will be imperfect; you’ll get faster and better with practice.
- Make extra filling. Use leftovers in salads, wraps, or as a topping for rice bowls.
- Be creative. Onigiri are a fantastic blank canvas — experiment with global flavors like peri-peri chicken, curry, or even barbecue for fusion versions.
Full Chicken Onigiri Recipe (concise recipe card)
Yield: ~8 medium onigiri
Time: 1 hour (including rice soak/cook) + cooling and shaping
Ingredients
- 3 cups Japanese short-grain rice, rinsed and soaked
- 3 1/4 cups water (for rice)
- 1/2 tsp salt
- 300–350 g chicken thighs, diced or shredded
- 2 tbsp soy sauce
- 1 1/2 tbsp mirin
- 1 tbsp sake (optional)
- 1 tbsp honey or sugar
- 1 tbsp sesame oil
- 1 tsp grated ginger
- 1 tsp minced garlic
- Nori, sesame seeds, furikake for finishing
Method (overview)
- Rinse and soak rice 20–30 minutes. Cook and let rest 10 minutes.
- Sear diced chicken in sesame oil, add ginger/garlic. Add soy, mirin, sake, and honey. Simmer until sauce thickens and coats chicken. Cool.
- Wet hands with salted water. Take warm rice, make a pocket, add 1–2 tbsp filling, close and form triangle or round.
- Wrap with nori or sprinkle sesame/furikake. Serve warm or room temperature.
Closing thoughts
This Chicken Onigiri Recipe is a celebration of simplicity and technique. With a few chef-level tricks — the right rice, properly reduced filling, light seasoning, and gentle shaping — you can create handheld comfort that’s elegant enough for guests and practical enough for everyday lunches. Don’t be afraid to experiment: once you’ve mastered the core technique, the world of flavors you can tuck inside a rice ball is limitless.
Chicken Onigiri Recipe
Ingredients
For the Rice
- 3 cups Japanese short-grain rice sushi rice, rinsed well
- 3¼ cups water adjust per rice brand
- ½ teaspoon salt optional
For the Chicken Filling
- 300 –350 g 10–12 oz boneless, skinless chicken thighs or breasts
- 2 tablespoons soy sauce
- 1½ tablespoons mirin
- 1 tablespoon sake optional
- 1 tablespoon honey or sugar
- 1 tablespoon toasted sesame oil
- 1 teaspoon grated fresh ginger
- 1 teaspoon minced garlic optional
- Pinch of black pepper
- 1 teaspoon toasted sesame seeds optional
For Assembly
- Nori sheets cut into strips
- Water + pinch of salt for hands
- Furikake or extra sesame seeds optional
Instructions
Cook the Rice
- Rinse the rice until the water runs clear. Soak for 20–30 minutes, then cook with measured water in a rice cooker or covered pot. Let rest for 10 minutes after cooking. Keep rice warm.
Prepare the Chicken Filling
- Dice or finely chop the chicken. Heat sesame oil in a skillet over medium heat. Add chicken and cook until lightly golden. Add ginger and garlic; cook briefly until fragrant.
Season and Simmer
- Add soy sauce, mirin, sake, and honey. Simmer on medium-low until the sauce thickens and coats the chicken evenly. Finish with black pepper and sesame seeds. Let cool to warm or room temperature.
Shape the Onigiri
- Lightly wet your hands with salted water. Scoop warm rice into your palm, flatten slightly, and add 1–2 tablespoons of chicken filling in the center. Gently enclose and shape into a triangle or round, pressing lightly.
Finish and Serve
- Wrap each onigiri with nori just before serving or sprinkle with furikake. Serve warm or at room temperature.
Notes
- Tips: Use Japanese short-grain rice for proper texture. Do not overfill to prevent breaking.
- Storage: Wrap individually and refrigerate up to 24 hours. For best texture, reheat gently before eating.
- Freezing: Freeze without nori for up to 1 month; reheat and wrap with fresh nori before serving.
- Variations: Try spicy chicken with sriracha, teriyaki shredded chicken, curry chicken, or miso-glazed chicken.