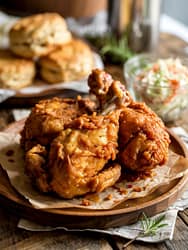
Buttermilk Fried Chicken Recipe

There’s comfort, crunch, and a whisper of tang in every bite of a perfect southern-style piece of chicken. This Buttermilk Fried Chicken Recipe walks you through everything I’ve learned as a professional chef: why buttermilk matters, how to build an outrageously crisp crust, timing for juicy meat, safety tips (especially important if you’re under 18), make-ahead strategies, and delicious variations. Read through once, then use the recipe card below when you cook.
Why this Buttermilk Fried Chicken Recipe works
A great fried chicken balances three things: flavour in the meat, a dry-but-crispy crust, and safe, even cooking. This recipe uses an acid-rich buttermilk marinade (which tenderizes and seasons), a seasoned flour + starch dredge (for crunch), and a controlled frying technique (for even doneness without burnt exterior). Small professional techniques—like resting the dredged pieces before frying, using a thermometer to keep oil temperature steady, and finishing thick pieces in a low oven—make the difference between “good” and “legendary.”
Ingredients (serves 4–6)
For the buttermilk marinade
- 1 quart (4 cups) buttermilk (full-fat preferred). If you don’t have buttermilk: 4 cups whole milk + 4 tbsp lemon juice or vinegar, let sit 10 minutes.
- 2 tbsp kosher salt
- 1 tbsp granulated sugar
- 2 tsp black pepper, freshly ground
- 2 tsp smoked paprika (or sweet paprika)
- 1 tsp cayenne pepper (adjust to taste)
- 3–4 garlic cloves, smashed
- 2 bay leaves (optional)
- Zest of 1 lemon (optional, brightens flavor)
For the chicken
- 3–4 lb whole chicken, cut into 8–10 pieces (or 8 bone-in, skin-on thighs/drumsticks). You can use bone-in breasts if you like, but they’ll need gentle finishing in the oven.
- OR 3 lb bone-in chicken wings or drumsticks for a batch of snacks
For the dredge (crust)
- 3 cups all-purpose flour
- 1 cup cornstarch or potato starch (adds extra crisp)
- 2 tbsp baking powder (helps puff the crust; optional but recommended)
- 2 tbsp kosher salt
- 1 tbsp black pepper
- 2 tsp garlic powder
- 2 tsp onion powder
- 2 tsp smoked paprika
- 1 tsp cayenne (optional, for heat)
- 1–2 tsp dried thyme or oregano (optional)
For frying
- Neutral oil with high smoke point: peanut, canola, sunflower, or refined avocado oil. You’ll need enough oil to come about 1¼–1½ inches up your pan (about 6–8 cups for a large skillet).
- A deep-fry thermometer (or an instant-read thermometer) — essential.
Finishing (optional)
- 2 tbsp unsalted butter (for brushing)
- Flaky sea salt (to finish)
Equipment you’ll want
- Large mixing bowl (for marinade)
- Large rimmed baking sheet or tray (for dredging and resting)
- Wire rack and sheet pan (for draining and cooling — this keeps crust crisp)
- Large heavy skillet (cast iron is ideal) or Dutch oven
- Deep-fry thermometer
- Tongs or a spider/skimmer
- Instant-read meat thermometer
Prep: timeline at a glance
- Day-before or morning: cut chicken and brine/marinate — ideally 12–24 hours.
- 1 hour before frying: bring chicken to fridge-cold (still cold is fine) or take from fridge 30 minutes before frying to remove chill—both approaches are used. (Cold chicken helps the crust adhere.)
- 30–45 minutes before frying: set up dredge station and preheat oil.
If you’re short on time, marinate 4 hours minimum—but longer gives better tenderness and flavor.
Step-by-step: marinade, dredge, and fry
1. Prepare the buttermilk marinade
In a large bowl, whisk buttermilk with salt, sugar, pepper, paprika, cayenne, garlic, bay leaves, and lemon zest. Submerge the chicken pieces fully in the mixture. Cover and refrigerate 4–24 hours. The acid and enzymes in buttermilk gently tenderize the meat and let flavours penetrate.
Safety note for cooks under 18: frying with hot oil involves burn risk. If you’re under 18, ask an adult to supervise the deep-frying step. You can still help with marinating, seasoning, dredging, and plating.
2. Make the dredge
Mix flour, cornstarch, baking powder, salt, pepper, and spices in a large bowl or shallow pan. Whisk to combine so the seasoning is even.
3. Set up the station
Place a wire rack over a sheet pan for resting fried pieces. Line another sheet pan near the stove with paper towels if you prefer (the rack is better for crispness). Have tongs ready and a thermometer on hand.
4. Dredge and rest
Remove one piece of chicken at a time from the buttermilk, letting excess drip back into the bowl. Dredge thoroughly in the flour mixture, pressing so the coating adheres. For an ultra-crisp crust, double-dredge: after the first dredge, dip quickly back in buttermilk (or in an egg wash: 2 eggs + 2 tbsp milk) and then re-dredge. Place dredged pieces on the wire rack and let rest 15–30 minutes. Resting helps the coating set; it won’t fall off in the oil.
5. Heat the oil
Fill a heavy skillet or Dutch oven with oil to about 1¼–1½ inches deep. Heat gently until it reaches 325–335°F (163–168°C). Start at slightly lower temp when adding cold chicken; the oil will drop in temperature.
6. Fry in batches
Carefully add 3–4 pieces (depending on pan size) without crowding. Crowding lowers oil temperature and leads to greasier chicken. Keep oil between 300–350°F during frying—use the thermometer and adjust heat. Cook bone-in thighs/drumsticks about 12–18 minutes, turning occasionally for even browning. Bone-in breasts may be 12–20 minutes depending on size. Wings are usually 8–10 minutes. When pieces reach internal temperature of 165–170°F (74–77°C) at the thickest point (without touching bone), they’re safe. For darker meat (thighs/drums), 175°F gives more tenderness.
7. Finish in the oven if needed
If exterior browns before interior reaches temp, move pieces to a preheated oven at 325°F (163°C) for 8–12 minutes to finish gently.
8. Drain and rest again
Drain on the wire rack, tent loosely with foil for a few minutes, and sprinkle with flaky salt and a touch of melted butter if desired. This brief rest lets juices redistribute.
Key technique tips (what pros do differently)
- Buttermilk + salt = gentle brine. The dairy acids and cultures break down proteins for tender meat; salt seasons thoroughly.
- Cornstarch/potato starch in the dredge reduces gluten formation and gives extra snap.
- Baking powder in the flour mix helps the crust puff and becomes light yet crisp.
- Resting the dredged pieces helps the coating adhere and reduces the chance it sloughs off in oil.
- Control oil temp — use a thermometer. Hotter than 360°F risks burning the crust; cooler than 300°F makes greasy chicken.
- Don’t overcrowd — work in batches so oil temp recovers quickly.
- Finish large pieces in the oven to avoid burned crust with raw interior.
- Rest on a rack, not paper — paper towels trap steam and soften the crust.
Flavor variations & customization
This Buttermilk Fried Chicken Recipe is a template — tweak it to make it your own.
Nashville-style hot chicken
- Add more cayenne (3–4 tbsp) to the dredge and make a spicy butter sauce (melted butter + cayenne + brown sugar + paprika) to brush on after frying. Serve with pickles.
Korean-style
- Add gochugaru (Korean chile flakes) to the dredge and double-fry for extra crunch. Toss with a sticky sauce: gochujang, honey, soy, garlic.
Herb-forward
- Add chopped fresh rosemary, thyme, or sage to buttermilk. Replace some flour with panko for extra texture.
Gluten-free
- Use a 1:1 gluten-free flour blend + potato starch; check blend for baking powder presence. Fry the same way.
Boneless “chicken tenders”
- Use boneless chicken breasts cut into strips, brine shorter (2–4 hours), and fry 4–6 minutes depending on thickness. Finish at 160–165°F.
Air-fryer or oven-friendlier
- For a lower-risk method, bake at 425°F on a wire rack for 25–35 minutes (turn halfway) until internal temp reached; spray lightly with oil or use high-heat oil in a mister. Or air-fry at 380°F for 12–18 minutes, flipping halfway. Texture is different (less deep-fried crisp) but safer for young cooks.
Serving suggestions & sauces
Classic plates:
- Coleslaw, buttery mashed potatoes, and warm buttermilk biscuits.
- Corn on the cob and pickles for a picnic feel.
- Hot honey drizzle (honey + chili flakes heated) or a side of country gravy.
Sauces:
- Classic honey mustard (mustard + honey + mayo).
- Creamy ranch or blue cheese for dipping.
- Spicy comeback sauce: mayo + ketchup + hot sauce + smoked paprika + garlic.
Presentation tip: serve on a large platter lined with paper and scatter fresh herbs and lemon wedges.
Storage, reheating, and making ahead
Refrigeration
- Cool completely, then store in an airtight container with paper towels between layers. Keeps 3–4 days.
Freezing
- Freeze fully cooled chicken in a single layer on a tray, then transfer to a freezer bag. Keeps up to 3 months. Thaw overnight in fridge before reheating.
Reheating (best method for crispness)
- Oven: 375°F (190°C) on a wire rack over a sheet pan for 10–15 minutes until heated through. Use foil tent only if you want softer crust.
- To revive extreme crisp: 400°F for 8–10 minutes but watch carefully.
- Microwave will make crust soggy—avoid unless you’ll finish in the oven.
Make-ahead strategy
- Marinate and dredge the night before; store dredged pieces on a rack covered lightly with plastic wrap in fridge. Fry the next day. Dredged, rested chicken tends to hold coating well.
Troubleshooting (common problems & fixes)
- Crust soggy/greasy: Oil too cool. Heat oil to 325–335°F and monitor. Don’t overcrowd pan. Ensure pieces are at least somewhat cold — if they’re warm, they lower oil temp more.
- Crust falls off: Coating didn’t set — rest dredged pieces 15–30 minutes before frying, press flour onto the chicken when dredging, or use an egg wash between dredges for stronger adhesion.
- Interior raw while exterior dark: Oil too hot or chicken too large. Lower heat and finish in the oven at 325°F until internal temp is safe.
- Breading burnt but inside fine: Too hot; reduce temp 10–20°F and cook longer, or finish in oven.
- Too salty: Reduce salt in dredge or buttermilk. Season lightly, remember you can always finish with flaky salt at service.
Nutrition & portioning (approximate)
A piece of bone-in fried chicken (thigh) prepared this way will vary greatly depending on size and oil absorption, but expect roughly 300–500 kcal per piece, with significant variation. If you need exact nutrition, calculate based on specific chicken weights and the exact amounts of oil and flour used.
Final pro tips — the secrets you’ll use forever
- Think of buttermilk as flavor + tenderizer, not just a soak. Add aromatics (garlic, lemon zest, herbs) to build depth.
- Double-dredge for a resilient crust. But don’t overwork the flour—press lightly.
- Wire rack is your best friend. Never let fried chicken steam on a flat surface.
- Use a thermometer religiously. Both for oil and for the chicken’s internal temp.
- Serve hot and fast. Fried chicken is best within the first hour, but a good reheating technique keeps it close to fresh.
Quick printable recipe (concise card)
But you asked me to avoid tables — so here’s a compact, copyable recipe:
Buttermilk Fried Chicken Recipe (serves 4–6)
- Marinade: 4 cups buttermilk, 2 tbsp salt, 1 tbsp sugar, 2 tsp black pepper, 2 tsp smoked paprika, 1 tsp cayenne, 3 garlic cloves. Marinate chicken 4–24 hrs.
- Dredge: 3 cups flour, 1 cup cornstarch, 2 tbsp baking powder, 2 tbsp salt, 1 tbsp pepper, 2 tsp garlic powder, 2 tsp onion powder, 2 tsp paprika.
- Fry: Oil to 1¼” depth, heat to 325–335°F. Fry in batches until internal temp 165–175°F (thighs 12–18 min, wings 8–10). Finish in 325°F oven if needed.
Safety reminder: adult supervision recommended for anyone under 18 when working with hot oil. For a lower-risk option, oven-bake at 425°F on a rack for 25–35 minutes.
Frequently asked questions
Q: Can I substitute yogurt for buttermilk?
Yes — plain whole-milk yogurt thinned with a little milk creates a similar acidic environment. Texture may be slightly different.
Q: How long should I marinate?
Minimum 4 hours; best 12–24 hours. Overnight gives best flavor and tenderness.
Q: Is double-frying worth it?
For extremely crunchy, restaurant-style shells, double-frying (first at lower temp to cook through, second at higher temp to crisp) is excellent but riskier at home. If you double-fry, be careful with oil temp and do it in short, controlled bursts.
Q: Can teenagers make this alone?
Teens can handle marinade, seasoning, dredging, and plating, but for safety, have an experienced adult handle the deep-frying. Use oven or air-fryer methods for safer solo cooking.
Closing thoughts
This Buttermilk Fried Chicken Recipe is designed to be forgiving and flexible: use it as a base, experiment with spices, and don’t be afraid to adjust times for your pieces and equipment. Respect the safety guidance, especially around hot oil, and you’ll be rewarded with juicy, deeply flavoured chicken and a crust that sings.
Buttermilk Fried Chicken Recipe
Ingredients
For the Buttermilk Marinade:
- 1.5 kg chicken pieces thighs, drumsticks, wings, or mixed cuts
- 2 cups buttermilk
- 1 tablespoon salt
- 1 teaspoon black pepper
- 1 teaspoon paprika
- 1 teaspoon garlic powder
- 1 teaspoon onion powder
- ½ teaspoon cayenne pepper optional for heat
- 1 tablespoon hot sauce optional
For the Seasoned Flour Coating:
- 2 cups all-purpose flour
- 2 tablespoons cornstarch for extra crispiness
- 1 tablespoon paprika
- 1 teaspoon garlic powder
- 1 teaspoon onion powder
- 1 teaspoon salt
- 1 teaspoon black pepper
- ½ teaspoon dried oregano
- ½ teaspoon cayenne pepper optional
For Frying:
- Vegetable oil canola oil, or peanut oil (enough for deep frying)
Instructions
Step 1: Prepare the Buttermilk Marinade
- In a large bowl, combine buttermilk, salt, black pepper, paprika, garlic powder, onion powder, cayenne pepper, and hot sauce. Mix well until evenly blended.
Step 2: Marinate the Chicken
- Add the chicken pieces into the marinade, ensuring every piece is fully coated. Cover and refrigerate for at least 4 hours, preferably overnight. Longer marination tenderizes the meat and enhances flavour.
Step 3: Prepare the Coating
- In a separate large bowl, whisk together flour, cornstarch, paprika, garlic powder, onion powder, salt, black pepper, oregano, and cayenne pepper.
Step 4: Dredge the Chicken
- Remove chicken pieces from the buttermilk marinade one at a time, allowing excess liquid to drip off. Coat thoroughly in the seasoned flour mixture, pressing lightly so the coating adheres well.
- Optional: For an extra crunchy crust, dip coated chicken briefly back into buttermilk and then into flour again (double dredge).
Step 5: Rest the Coated Chicken
- Place the coated chicken on a wire rack and let it rest for 15–20 minutes. This helps the coating stick better during frying.
Step 6: Heat the Oil
- Heat frying oil in a deep skillet or heavy pot to approximately 175°C (350°F). Maintaining consistent temperature ensures even cooking and crispy texture.
Step 7: Fry the Chicken
- Carefully lower chicken into hot oil without overcrowding. Fry in batches if necessary.
- Fry for 12–18 minutes depending on the size of pieces.
- Turn occasionally for even browning.
- Internal temperature should reach 74°C (165°F) when fully cooked.
Step 8: Drain and Rest
- Transfer fried chicken onto a wire rack or paper towels to drain excess oil. Let rest for 5 minutes before serving to allow juices to redistribute.
Notes
- Crispier Texture Tip: Adding cornstarch or potato starch to the flour improves crunchiness.
- Oil Temperature: If oil is too hot, coating burns before chicken cooks through; too cool leads to greasy results.
- Make Your Own Buttermilk: Mix 1 cup milk with 1 tablespoon lemon juice or vinegar and let sit for 5 minutes.
- Storage: Store leftovers in an airtight container in the refrigerator for up to 3 days.
- Reheating: Reheat in oven or air fryer at 180°C (350°F) to restore crispiness.
- Flavour Variations: Add smoked paprika, chili powder, or Cajun seasoning for different flavour profiles.
- Healthier Option: Remove skin before marinating to reduce fat content.