Bloody Red Velvet Popcorn Recipe
If you love the tangy-sweet nostalgia of red velvet cake and the cozy crunch of popcorn, then this Bloody Red Velvet Popcorn recipe is made for you. Think glossy, crimson-drizzled clusters of popcorn with whispering notes of cocoa, vanilla, and a subtle tang — finished with a dramatic “bloody” syrup that makes it impossible not to reach for another handful. It’s showy enough for Halloween, elegant enough for a dinner party, and simple enough for a weeknight snack attack.
Below you’ll find everything: ingredient notes, step-by-step technique, troubleshooting tips, clever variations (including vegan and gluten-free), storage, serving ideas, and FAQs — all delivered in a chef’s voice so you get pro tips that actually improve results. Let’s make popcorn with personality.
Why this Bloody Red Velvet Popcorn works
This recipe takes three familiar ideas and combines them:
- Popcorn — neutral, airy vehicle that loves coating.
- Red velvet flavor — subtle cocoa, vanilla, and a touch of tang.
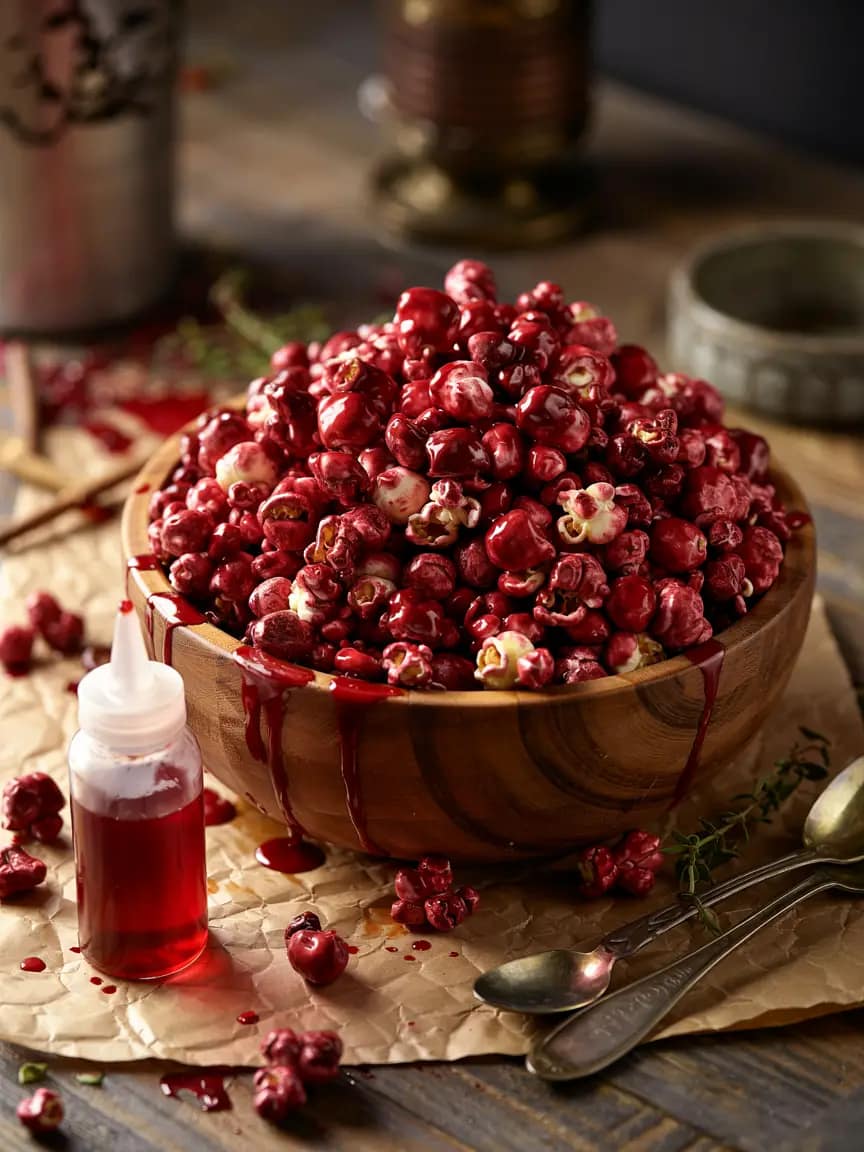
- Dramatic red “blood” finish — glossy, visually striking, slightly sticky drizzle that gives a Halloween/party flourish.
Key technique: coat the popcorn in a smooth white-chocolate base flavored with cocoa and vanilla, then finish with a glossy red syrup/drizzle. The white chocolate gives structure and shine; cocoa gives depth; and the syrup creates that “bloody” theatrical effect without drowning the flavor.
Ingredients
This recipe makes about 10–12 cups finished popcorn (serves ~4–6 as a snack). Quantities are adjustable; scale up for a crowd.
For the popcorn
- 1/2 cup (100 g) high-quality popcorn kernels (or about 6–7 cups popped if using pre-popped)
- 2 tablespoons neutral oil (grapeseed, canola, or vegetable) for stovetop popping
- 1/2 teaspoon fine sea salt (adjust to taste)
For the red velvet coating
- 10 ounces (280 g) white chocolate or white candy melts — NOT white chocolate chips (they can be used, but couverture or candy melts melt more predictably)
- 2 tablespoons unsalted butter (optional — for sheen and mouthfeel; use coconut oil for vegan)
- 1 tablespoon Dutch-processed cocoa powder (sifted) — provides the red velvet cocoa note without making the mixture dark
- 1 teaspoon pure vanilla extract
- 1/2 teaspoon cream of tartar or 1 teaspoon lemon juice (optional — adds that tang synonymous with red velvet; useful if you don’t have buttermilk powder)
- 2 tablespoons powdered sugar (optional — for slight sweetness and body)
- A few drops red gel food coloring (start with 6–8 drops and add to reach desired shade). Use gel coloring — it won’t thin the coating.
For the “bloody” drizzle
Option A — simple glossy corn syrup syrup (best for show):
- 1/3 cup light corn syrup
- 2–3 teaspoons powdered sugar (to thicken slightly)
- Red gel food coloring to deep crimson
- 1 teaspoon raspberry or cherry liqueur or 1 teaspoon raspberry extract (optional for flavor)
Option B — natural raspberry coulis (for flavor-forward, less glossy “blood”):
- 3/4 cup raspberries (fresh or frozen)
- 2–3 tablespoons sugar (adjust for sweetness)
- 1 teaspoon lemon juice
- Strain seeds for smooth finish
Optional finishing touches
- A pinch of flaky sea salt (for contrast)
- Freeze-dried strawberries (crushed) for texture and tartness
- Red sanding sugar or Halloween sprinkles
- White drizzle (undiluted white chocolate) to create contrast
Substitutions / Dietary notes
- Vegan: use vegan white chocolate or carob-based melts, coconut oil instead of butter, and maple syrup + beet powder for color if avoiding artificial dyes.
- Gluten-free: popcorn is naturally gluten-free; check candy melts for cross-contamination.
Equipment
- Large heavy-bottomed pot with lid for stovetop popping (or an air popper)
- Large mixing bowl (big enough for popcorn and coating)
- Saucepan and heatproof bowl for melting chocolate (double-boiler method or microwave-safe bowl)
- Baking sheet lined with parchment or silicone mat
- Spatula and wooden spoon
- Small squeeze bottle or spoon for glazing/drizzling
Step-by-step preparation
I’ll walk you through the process like I would in a professional kitchen: clean mise en place, controlled heat, and attention to timing.
1. Pop the popcorn
- Place a large pot over medium-high heat and add the oil. Add three kernels and cover.
- When those kernels pop, add the remaining 1/2 cup of kernels in an even layer. Cover and gently shake the pot back and forth over the heat so kernels heat evenly.
- Once popping slows to 2–3 seconds between pops, remove from heat. Transfer popped corn to a large bowl. Discard unpopped kernels. Sprinkle with 1/2 teaspoon salt and toss lightly.
Chef tip: For the crispiest final texture, keep the popped corn uncovered briefly to let steam escape — trapped steam makes soggy coating later.
2. Prepare the red velvet coating
- Finely chop the white chocolate or measure candy melts. Place in a heatproof bowl.
- If using a double boiler: fill a saucepan with an inch of water, bring to a gentle simmer, place the bowl over the pan (bowl shouldn’t touch the water), and stir chocolate until just melted.
If using a microwave: heat in 20–30 second bursts at 50% power, stirring between bursts. - Once smooth, whisk in butter (or coconut oil), vanilla, sifted cocoa powder, powdered sugar (if using), and cream of tartar or lemon juice. Mix until smooth.
- Add red gel food coloring a few drops at a time, stirring, until you hit a rich, deep red. Gel coloring is potent — a little goes a long way. Aim for a vivid red-crimson rather than pink.
- If the mixture seems too thick to drizzle, add 1/2 teaspoon neutral oil or 1 teaspoon light corn syrup to loosen.
Chef tip: Avoid overheating white chocolate — it seizes easily. If it thickens or grainy, add a teaspoon of neutral oil and gently rewarm.
3. Coat the popcorn
- Pour about two-thirds of the popped popcorn into the bowl with the coating.
- Using a large spatula, quickly fold the popcorn through the coating so it’s evenly glazed. Work fast: white chocolate sets as it cools.
- Transfer the coated popcorn onto a parchment-lined baking sheet and spread into an even layer. Break up big clumps with your hands (wear gloves if it’s hot).
- Repeat the process with the remaining popcorn and any leftover coating. If you prefer clusters, press gently to form them; otherwise keep loose for munching.
4. Bake briefly to set (optional, but recommended)
- Preheat oven to 250°F (120°C).
- Bake the coated popcorn for 8–12 minutes, rotating the pan halfway through. This helps dry the coating and makes the popcorn crisp — not soft.
- Remove from oven and let cool completely on the sheet; the coating will firm up.
Chef note: Don’t bake too long or at too high a temp — white chocolate can discolor or bloom.
5. Make the “bloody” drizzle
Choose Option A (corn syrup gloss) for dramatic shine or Option B (raspberry coulis) for flavor.
Corn syrup “blood”
- In a small bowl, whisk 1/3 cup light corn syrup with powdered sugar and a teaspoon of liqueur/extract if using.
- Add red gel coloring until a deep crimson is achieved. The mixture should be syrupy but pourable.
- Transfer to a squeeze bottle or use a spoon to drizzle.
Raspberry coulis
- Heat raspberries and sugar in a small saucepan until sugar dissolves and fruit breaks down.
- Add lemon juice. Simmer 2–4 minutes. Strain through a fine sieve, pressing to extract juices. Chill slightly so it thickens.
6. Finish and decorate
- Place cooled, coated popcorn back on a clean baking sheet.
- Drizzle the red “blood” over the popcorn in long, theatrical strokes. If you want splatter effects, flick with a fork.
- Optionally, add crushed freeze-dried strawberries, sprinkles, or a light pinch of flaky sea salt.
- Let set 10–20 minutes before serving (corn syrup will tack up but remains sticky; coulis will set slightly).
Serving suggestions
- Serve in a large bowl for movie night — dramatic and shareable.
- For Halloween: fill small paper cones or brown kraft bags and top with a plastic spider for an eerie effect.
- For a dinner party: present in individual glass jars with a small label “Bloody Red Velvet Popcorn” — it’s theatrical and memorable.
- Pairing: the popcorn’s sweet-tangy profile matches milk, a dark roast coffee, or a slightly tannic red wine (think Beaujolais or Gamay for balance).
Variations & flavor twists
This is a flexible canvas. Here are tested variations that preserve the theme.
1. Double Chocolate Red Velvet Popcorn
- Add 2 ounces dark chocolate, melted, drizzled over the popcorn in thin lines after baking. Creates contrast and deeper cocoa notes.
2. Cream Cheese Drizzle (true red velvet echo)
- Whip 3 oz cream cheese with 3/4 cup powdered sugar and 1/2 teaspoon vanilla. Thin with a teaspoon of milk if needed. Tint pale pink with a few drops of red gel and drizzle. For stability, chill before drizzling.
3. Spicy Bloody Red Velvet
- Add 1/4 teaspoon cayenne or 1/2 teaspoon smoked paprika to the red velvet coating for a surprising heat contrast.
4. Fruity “Blood”
- Swap corn syrup blood for reduced cherry or raspberry preserves heated and strained — more flavor, less gloss.
5. Gluten-Free / Paleo-ish
- Use popcorn (naturally GF) and a paleo-friendly white chocolate made with cocoa butter and coconut sugar. For color, use beet powder mixed with a little coconut oil.
6. Vegan
- Use vegan white chocolate, coconut oil, and aquafaba-based cream cheese alternative for the drizzle.
Make-ahead, storage & presentation
- Short term: Store leftover popcorn in an airtight container at room temperature for up to 3 days. Because of the syrupy drizzle, it’s best consumed within 48 hours for crunch.
- Long term: Don’t refrigerate — humidity ruins the crunch. If you must, freeze in airtight bags for up to 2 weeks; thaw at room temp before serving.
- Transport: Layer between sheets of parchment in a box for gifting. Use small paper cones or cellophane treat bags for party favors.
Troubleshooting & chef’s fixes
Problem: White chocolate seized (grainy, thick)
- Fix: Add a teaspoon of neutral oil or light corn syrup and gently warm to smooth. If it’s irretrievably grainy, add more fat (butter or oil) and strain through a fine sieve — or start fresh and fold the grainy bits into the popcorn for a rustic finish.
Problem: Popcorn became soggy after coating
- Cause: Steam trapped during coating or not baking to set.
- Fix: Spread popcorn in a thin layer on a baking sheet and bake at 250°F (120°C) for 8–12 minutes to dry and re-crisp.
Problem: Pale, pink coating instead of deep red
- Use gel or paste food coloring (more concentrated than liquid) and slowly add until you reach a deep red. Keep in mind cocoa dulls some color — adjust accordingly.
Problem: “Blood” drizzle is too runny
- Add powdered sugar a little at a time or refrigerate for a few minutes to thicken. For coulis, simmer longer to reduce and thicken.
Nutrition & portion guidance
This is an indulgent treat. A typical 1-cup serving (approx.) will be sweet, a bit fat-rich (white chocolate + butter), and fairly high in sugar, especially if using corn syrup or sugar-based coulis. If you want lighter, reduce the amount of coating and increase popcorn ratio, or use sugar alternatives in the drizzle. For accurate calorie counts, plug your ingredient brands into a nutrition calculator.
FAQs
Can I use regular milk chocolate instead of white chocolate?
Yes, but red color will not read the same. Darker chocolate will mute the red velvet aesthetic. Use white chocolate for the red velvet look; then drizzle dark chocolate for contrast if you like.
What if I don’t have gel color?
Liquid food color works but requires more — and will thin the coating. Alternatives: powdered beet powder (for natural color), or a very small amount of concentrated raspberry powder for color and flavor.
Is it safe to add alcohol (liqueur) to the drizzle?
Yes — a teaspoon of liqueur adds flavor. Don’t add large amounts or it will thin the syrup and affect setting.
Can I make this nut-free?
Absolutely. Ensure chocolate/candy melts are processed in a nut-free facility if you have severe allergies.
Presentation ideas (for maximum effect)
- Place the popcorn on a long wooden board with a few dollops of extra “blood” syrup spaced around, and scatter freeze-dried strawberries and edible silver leaf for drama.
- For a spooky party tray, surround the popcorn with black licorice “fingers” and small glass jars labeled “bloody” for guests to spoon over.
- For a romantic twist (Valentine’s Day), place popcorn into mini mason jars, tie with red ribbon, and add a tag that reads “Bloody Red Velvet Popcorn — hand-crafted with love.”
Final chef’s notes
The trick to a standout Bloody Red Velvet Popcorn recipe is balance: build red velvet flavor without overwhelming the popcorn’s crunch; make the red dramatic but not artificial tasting; and focus on texture — glossy drizzle contrasted with crisp popcorn and, if desired, crunchy sprinkle or freeze-dried fruit for contrast.
Don’t be afraid to experiment: try a little cream cheese drizzle to nod directly to red velvet frosting, or pair the popcorn with a tiny cup of warm chocolate dip for dunking. Most importantly, taste as you go and adjust. Popcorn is forgiving and fast — great for improvisation.

Bloody Red Velvet Popcorn Recipe
Ingredients
For the popcorn
- 1/2 cup 100 g popcorn kernels (or ~6–7 cups popped)
- 2 tablespoons neutral oil grapeseed, canola, or vegetable
- 1/2 teaspoon fine sea salt
For the red velvet coating
- 10 oz 280 g white chocolate or white candy melts
- 2 tablespoons unsalted butter or coconut oil for vegan
- 1 tablespoon Dutch-processed cocoa powder sifted
- 1 teaspoon pure vanilla extract
- 1/2 teaspoon cream of tartar or 1 teaspoon lemon juice — optional, for tang
- 2 tablespoons powdered sugar — optional for body
- Red gel food coloring a few drops (start with 6–8 drops)
For the “bloody” drizzle (glossy option)
- 1/3 cup light corn syrup
- 2 –3 teaspoons powdered sugar
- Red gel food coloring to deep crimson
- 1 teaspoon raspberry or cherry extract or liqueur optional
Optional finishing
- Pinch of flaky sea salt
- Crushed freeze-dried strawberries
- Red sanding sugar or Halloween sprinkles
Instructions
Pop the popcorn
- Heat a large, heavy-bottomed pot over medium-high heat with the 2 tablespoons oil. Add three test kernels and cover.
- When they pop, add remaining kernels in an even layer, cover, and gently shake the pot occasionally until popping slows to 2–3 seconds between pops.
- Remove from heat, transfer popcorn to a very large bowl, discard unpopped kernels, and sprinkle with 1/2 teaspoon salt. Let steam escape uncovered for a few minutes.
Melt the white chocolate
- Place chopped white chocolate or candy melts in a heatproof bowl.
- Melt gently over a double boiler or in the microwave (20–30 second bursts at 50% power), stirring frequently until smooth.
- Stir in the butter (or coconut oil), vanilla, sifted cocoa powder, powdered sugar (if using), and cream of tartar or lemon juice. Mix until silky.
Color and adjust
- Add red gel food coloring a few drops at a time, stirring to reach a deep crimson (aim for vivid red-crimson, not pink).
- If coating is too thick to drizzle, loosen with 1/2 teaspoon neutral oil or 1 teaspoon light corn syrup.
Coat the popcorn
- Pour two-thirds of the popped popcorn into the bowl with the coating. Fold quickly but gently with a spatula until evenly glazed.
- Spread the coated popcorn on a parchment-lined baking sheet in a single layer. Break large clumps as desired.
- Repeat with the remaining popcorn and any leftover coating.
Bake to set (optional — recommended for crispness)
- Preheat oven to 250°F (120°C).
- Bake the coated popcorn for 8–12 minutes, turning the pan halfway through to dry and set the coating. Remove and cool completely on the sheet.
Make the “bloody” drizzle
- Whisk corn syrup with powdered sugar and a splash of liqueur or extract (if using). Add red gel color to achieve deep crimson and a glossy, pourable consistency.
- (Alternative: make a flavored coulis by simmering raspberries with sugar, straining, and reducing to a thick sauce.)
Finish and decorate
- Drizzle the glossy red “blood” over the cooled popcorn in long theatrical strokes using a squeeze bottle or spoon. For splatter effects, flick gently with a fork.
- Sprinkle crushed freeze-dried strawberries or sanding sugar, and add a light pinch of flaky sea salt if desired. Let set 10–20 minutes.
Notes
- Texture tip: Allow steam to escape from freshly popped corn before glazing — trapped steam causes sogginess. The brief bake at 250°F (120°C) helps keep the popcorn crisp.
- Color tip: Use gel or paste food coloring for best, most concentrated red. Liquid color may thin the coating.
- Seized chocolate fix: If white chocolate becomes grainy, stir in 1 tsp neutral oil or light corn syrup and warm gently until smooth.
- Make-ahead & storage: Store in an airtight container at room temperature up to 48–72 hours for best crunch. Avoid refrigeration (moisture) and long storage (syrup can make popcorn sticky).
- Dietary substitutions: For vegan, use vegan white melts and coconut oil. For a more natural color, use beet powder or reduced raspberry coulis (note: color will be less glossy).
- Flavor variations: Try cream-cheese drizzle (cream cheese + powdered sugar + vanilla), dark chocolate contrast drizzle, or a spicy kick with a pinch of cayenne in the coating.
- Presentation: Serve in paper cones, individual mason jars, or a communal bowl with extra “blood” on the side for dramatic pouring.